Refactoring Data stored in Unity Prefabs, Scenes and other Assets
Using Unity, most of the Data will be serialized inside Prefabs, Scenes (inside MonoBehaviour serialized fields) and other Assets. In our case we also use data only Prefabs and GameObjects.
Refactoring Code is a common and recommended good practice and there are tools to help in that task. For example, Rider IDE provides a great with C# code refactors and also by adjusting Unity assets and metadata (like when you change a MonoBehaviour’s class name).
However, there are no tools in Unity (that I know) to Refactor Data in terms of data structure changes even though it is common in software development. When we say data structure, we include stuff like: renaming fields, changing field types, moving fields from component to component, moving components from object to object, etc.
In the case of Prefabs and Scenes data is stored in class Component and MonoBehaviour is the most common Component. In this blog post, we treat both terms like synonymous (even though we know they are not).
Our use case is when we want to store data in a different (hopefully better) way when there is already a lot of created content (prefabs, scenes, etc). Even if we want to manually do that, it is not easy to know, in terms of GameObjects and Scenes, where the data is used.
Luckily for us, Unity provides API that includes exploring Prefabs (open them in edit mode, check if they are variants), Scenes (load/unload scenes) and Assets and that can be used for our refactors.
By the way, I’ve created a Github Project named unity-refactory-tools with the code used in this blog post and also some examples to see the refactor running, if you are interested, feel free to download and try it.
Normally the steps for data refactoring are these:
- Add new redundant data structure and/or types.
- Run Automated Refactor to transform from previous data structure to new one.
- Manually change code to use new data structure.
- Remove old data structure and values and reserialize to remove unused serialized data.
We are only covering the second step in the blog post.
A pseudo code for the automated Refactor would be something like this:
  find prefabs with the data to be modified
  iterate in non variant prefabs
    update data
    save
  iterate in prefab variants
    if data was overwritten in variant
      update data
      save
  iterate in all scenes
    get objects with data
      if object is not prefab instance
        update data
        mark scene modified
      else
        if data was overwritten in instance
          update data
          mark scene modified
    if scene modified
      save scene
In practice, our current code looks like this:
public static void RefactorMonoBehaviour<T>(bool includeScenes, Func<GameObject, bool> callback) where T : Component
{
  var guids = AssetDatabase.FindAssets($"t:prefab", null);
  var prefabs = guids.Select(g => AssetDatabase.LoadAssetAtPath<GameObject>(
      AssetDatabase.GUIDToAssetPath(g))).ToList();

  // Ignore prefabs without component T
  prefabs = prefabs.Where(p => p.GetComponentInChildren<T>(true) != null).ToList();

  // We sort by no variant prefabs first
  prefabs.Sort(delegate(GameObject a, GameObject b)
  {
    var aIsVariant = PrefabUtility.IsPartOfVariantPrefab(a);
    var bIsVariant = PrefabUtility.IsPartOfVariantPrefab(b);

    if (!aIsVariant && bIsVariant)
        return -1;

    if (aIsVariant && !bIsVariant)
        return 1;

    // if both no variants or both variants, we just use the name to compare just to be consistent.
    return a.name.CompareTo(b.name);
  });

  prefabs.ForEach(delegate(GameObject o)
  {
    Debug.Log(o.name);
  });

  try
  {
    var total = prefabs.Count;

    EditorUtility.DisplayProgressBar($"Refactoring {total} prefabs with {typeof(T).Name}", "Start", 0);

    for (var i = 0; i < prefabs.Count; i++)
    {
        var prefab = prefabs[i];
        EditorUtility.DisplayProgressBar($"Refactoring {prefabs.Count} assets of type {typeof(T).Name}",
            prefab.name,
            i / (float)total);

        var contents = PrefabUtility.LoadPrefabContents(AssetDatabase.GetAssetPath(prefab));

        var result = callback(contents);

        // Just to break the loop if something is wrong...
        if (!result)
        {
            PrefabUtility.UnloadPrefabContents(contents);
            break;
        }

        PrefabUtility.SaveAsPrefabAsset(contents, AssetDatabase.GetAssetPath(prefab));
        PrefabUtility.UnloadPrefabContents(contents);
    }
  }
  finally
  {
    EditorUtility.ClearProgressBar();
  }

  // Then iterate in all scenes (if include scenes is true)

  if (!includeScenes)
    return;

  var allScenesGuids = new List<string>();

  // Here we filter by all assets of type scene but under Assets folder to avoid all other scenes from
  // external packages.
  allScenesGuids.AddRange(AssetDatabase.FindAssets("t:scene", new []
  {
    "Assets"
  }));

  EditorUtility.DisplayProgressBar($"Refactoring {allScenesGuids.Count} scenes", "Starting...", 0);

  var allScenesCount = allScenesGuids.Count;
  for (var i = 0; i < allScenesCount; i++)
  {
    var sceneGuid = allScenesGuids[i];
    var scenePath = AssetDatabase.GUIDToAssetPath(sceneGuid);

    try
    {
      EditorUtility.DisplayProgressBar($"Refactoring {allScenesGuids.Count} scenes", scenePath,
          i / (float) allScenesCount);

      var scene = SceneManagement.EditorSceneManager.OpenScene(scenePath,
          SceneManagement.OpenSceneMode.Single);

      var componentsList = new List<T>();

      // We can iterate over root objects and collect stuff to run the refactor over
      var rootObjects = scene.GetRootGameObjects();
      for (var j = 0; j < rootObjects.Length; j++)
      {
        var go = rootObjects[j];
        var components = go.GetComponentsInChildren<T>(true);
        componentsList.AddRange(components.ToList());
      }

      var modified = false;

      foreach (var component in componentsList)
      {
        var result = callback(component.gameObject);
        if (result)
        {
          modified = true;
          EditorUtility.SetDirty(component);
        }
    }

      if (modified)
      {
        SceneManagement.EditorSceneManager.MarkSceneDirty(scene);
        SceneManagement.EditorSceneManager.SaveScene(scene);
      }

    }
    finally
    {
      EditorUtility.ClearProgressBar();
    }
  }
}
Change field type
Change a field from one type to another. For example, change to store multiple fields (normally related) into a struct.
[Serializable]
public struct Speed
{
    public float baseValue;
    public float incrementValue;
}

public class CustomBehaviour : MonoBehaviour
{
  // Redundant code here
  public float speedBaseValue;
  public float speedIncrementValue;

  public Speed speed;
}

[MenuItem("Refactors/Refactor Custom MonoBehaviour")]
public static void Refactor2()
{
  RefactorTools.RefactorMonoBehaviour<CustomBehaviour>(true, delegate(GameObject gameObject)
  {
    var behaviours = gameObject.GetComponentsInChildren<CustomBehaviour>();
    foreach (var behaviour in behaviours)
    {
      behaviour.speed = new Speed
      {
        baseValue = behaviour.speedBaseValue,
        incrementValue = behaviour.speedIncrementValue
      };
    }
    return true;
  });
}
We used this kind of refactor a lot and also the case of changing from bool fields to enum type to store multiple values.
This could also be used to transform data for game design, like, we were storing half the speed for some enemies, so update all enemies with some criteria to double the stored speed.
Move Component to Parent
Restructure the hierarchy of a GameObject by moving a Component to its parent object.
// here we have a simple component, stored in child object
public class ComponentA : MonoBehaviour
{
  public int someValue;
}

// The refactor would be something like this
[MenuItem("Refactors/Refactor ComponentA to Parent")]
public static void Refactor3()
{
  RefactorTools.RefactorMonoBehaviour<ComponentA>(true, delegate(GameObject gameObject)
  {
    if (gameObject.transform.parent == null)
      return false;

    var parentGameObject = gameObject.transform.parent.gameObject;

    var parentComponentA = parentGameObject.GetComponent<ComponentA>();

    if (parentComponentA == null)
    {
      parentComponentA = parentGameObject.AddComponent<ComponentA>();
    }

    var componentA = gameObject.GetComponent<ComponentA>();
    var json = JsonUtility.ToJson(componentA);
    JsonUtility.FromJsonOverwrite(json, parentComponentA);

    Object.DestroyImmediate(componentA);

    return true;
  });
}
There is no Editor Utility, that I know of, to move a Component from one object to another so we are using JSON serialization in this case (we could’ve use SerializedObject too).
I’m not sure if this covers all the fields properly but I suppose it does for all serializable stuff. There could be another approach using reflection.
If you happen to know how to use internal Unity’s API to do move Components, I would be glad to know it.
Note: if you run this refactor script multiple times, it will keep moving up in the hierarchy. We could add other considerations, like being root or being a leaf.
Move Component to Children
Restructure the hierarchy of a GameObject by moving a Component down.
public class ComponentB : MonoBehaviour
{
  public int anotherValue;
}

[MenuItem("Refactors/Refactor ComponentB to first children")]
public static void Refactor4()
{
  RefactorTools.RefactorMonoBehaviour<ComponentB>(true, delegate(GameObject gameObject)
  {
    // will ignore this case
    if ("Child_WithComponentB".Equals(gameObject.name))
      return false;

    GameObject childObject;

    if (gameObject.transform.childCount == 0)
    {
      childObject = new GameObject("Child_WithComponentB");
      childObject.transform.SetParent(gameObject.transform);
    }
    else
    {
      childObject = gameObject.transform.GetChild(0).gameObject;
    }

    var childComponentB = childObject.GetComponent<ComponentB>();

    if (childComponentB == null)
    {
      childComponentB = childObject.AddComponent<ComponentB>();
    }

    var componentB = gameObject.GetComponent<ComponentB>();
    var json = JsonUtility.ToJson(componentB);
    JsonUtility.FromJsonOverwrite(json, childComponentB);

    Object.DestroyImmediate(componentB);

    return true;
  });
}
Note: if you run the refactor script multiple times, it will keep moving it down in the hierarchy. We could add other considerations, like being root or being a leaf.
Considering references when refactoring
Now, what happens when, for example, that ComponentB is being referenced by a ComponentC:
public class ComponentC : MonoBehaviour
{
  public ComponentB referenceToB;
}
In those cases, what we normally do is to manually fix that reference inside the refactor script:
...
var componentC = gameObject.GetComponent<ComponentC>();
if (componentC.referenceToB == componentB)
{
    componentC.referenceToB = childComponentB;
}
...
Obviously, we are only covering the case where ComponentC is used in the exactly same GameObject. If we want to do more, we could start expanding the refactor script to consider more cases but it will be still manual work, we don’t have an automatic way to cover all cases (yet).
Remove unused MonoBehaviour class
When a MonoBehaviour class is removed from the code, all assets (prefabs and scene’s objects) using that MonoBehaviour will have a missing script. If you do that without previously taking care, it is a bit complicated to fix since you can’t identify the reference anymore.
A good practice we follow is to previously run a refactor script to remove the MonoBehaviour and only after that remove it from code.
[MenuItem("Refactors/Refactor Custom MonoBehaviour")]
public static void RefactorCustomMonoBehaviour()
{
  RefactorTools.RefactorMonoBehaviour<CustomBehaviour>(true, delegate(GameObject gameObject)
  {
    var behaviours = gameObject.GetComponentsInChildren<CustomBehaviour>();
    foreach (var behaviour in behaviours)
    {
      Object.DestroyImmediate(behaviour);
    }
    return true;
  });
}
There is the special case where a GameObject only had that MonoBehaviour and there might be a good idea to remove the GameObject as well if it is empty (no children and no references to it from elsewhere).
Refactoring Data stored in Assets
Refactoring assets is easier than Prefabs but still we have to follow the same steps in order to conclude the refactor.
A pseudo code for the refactor is something like this:
  find assets of type T
  for asset in assets
    update asset data
    save asset
Here is a template code to use:
public static void RefactorAsset<T>(Func<T, bool> callback) where T : UnityEngine.Object
{
  var guids = AssetDatabase.FindAssets($"t:{typeof(T)}", null);
  var assets = guids.Select(g => AssetDatabase.LoadAssetAtPath<T>(
      AssetDatabase.GUIDToAssetPath(g))).ToList();

  try
  {
    var total = assets.Count;

    EditorUtility.DisplayProgressBar($"Refactoring {total} assets of type {typeof(T).Name}", "Start", 0);

    for (var i = 0; i < assets.Count; i++)
    {
      var asset = assets[i];
      EditorUtility.DisplayProgressBar($"Refactoring {assets.Count} assets of type {typeof(T).Name}",
          asset.name,
          i / (float)total);

      var result = callback(asset);

      if (result)
      {
        EditorUtility.SetDirty(asset);
      }
    }

    AssetDatabase.SaveAssets();
  }
  finally
  {
      EditorUtility.ClearProgressBar();
  }
}
Note: a recommendation here is to use my AssetDatabaseExt gist to simplify data refactors.
An example usage:
[MenuItem("Refactors/Refactor Custom Data")]
public static void RefactorCustomData()
{
    RefactorTools.RefactorAsset(delegate(CustomDataAsset asset)
    {
        asset.newValue = $"VALUE:{asset.previousValue}";
        return true;
    });
}
Finally
This approach proved to be very helpful in our games and allowed us to improve our Data Structure while the game content was growing and since we started early on, we trained ourselves to consider more edge cases so our refactors became more consistent and solid in time.
One good practice is to run one refactor at a time so you can validate the results are correct and only then apply the next one. Otherwise, you will have a lot of structural changes and it is not going to be clear what was completed correctly and what not.
Another one is to create temporary Prefabs and Scenes with edge cases before running the Refactor to be used to manually validate the results were applied correctly. Not sure if some of this could be automated but it would be great.
Currently, there is no easy way to automatically synchronize Code Refactor with Data Refactor, so some Code Refactor steps must be performed manually during the Data Refactor. I suppose it could be great to have a meta script, like this pseudo code:
void MetaRefactorIdea() {
  Code.CreateFieldWithNewType();
  Unity.CopyDataFromOldFieldToNewOne();
  Code.ChangeCodeToReferenceNewField();
  Code.RemoveOldField();
}
Sometimes, other serialization changes appear for data we didn’t modified. Most of the time this happens when a previous code change wasn’t reserialized yet. What we do in this case is to revert our changes (with version control), then run a reserialization on the assets (or in all assets), then commit those changes to finally run the refactor again.
Our current refactor approach is covering just a thin layer, it is like the “hello world” of refactors and there is a lot of space to cover, for example, using reflection to automatically change references (maybe next time) or automatically exploring other assets like Mechanim Animations to fix structural changes (moved objects, changed field names, etc).
Future work
I believe there are common Data Refactors that could be reused between projects, for example, Move Component from Object to Object.
As it happens with code too, specific refactors sometimes are needed and cannot be escaped from but improving tools and reusing code can help in having less manual error and cover more edge cases.
Also, would love to continue working on helping those reference cases, there are useful tools like FindReference which help in knowing where an asset is being used, so mixing Data Refactors with that and maybe reflection could be a great way of covering more and more refactoring data space.
Remember there is a Github unity-refactory-tools with the code used here.
As always, thanks for reading and hope this blog post was useful and would be great to hear your opinion on this topic to improve together. See you next time.
If you like it, check my twitter account and retweet, it would be super helpful for me.
Using Custom Editors to interact with Unity ECS World
Introduction
After reading, follow, retweet, like and or comment if you like it.
By default, the Unity’s Editor comes with tools like the Inspector window to help you visualize and modify GameObjects’s values while editing or even at runtime.
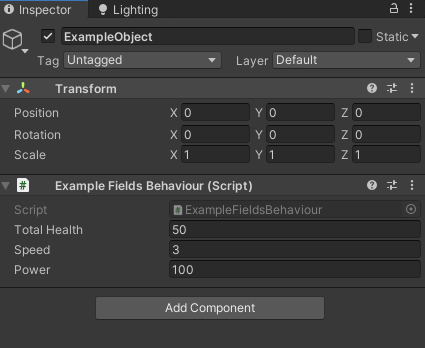
For example, if you add a MonoBehaviour like this one to your GameObject:
public class ExampleFieldsBehaviour : MonoBehaviour
{
    public float totalHealth;
    public float speed;

    [SerializeField]
    private int power;
}
It will be visualized by the default Inspector like this:
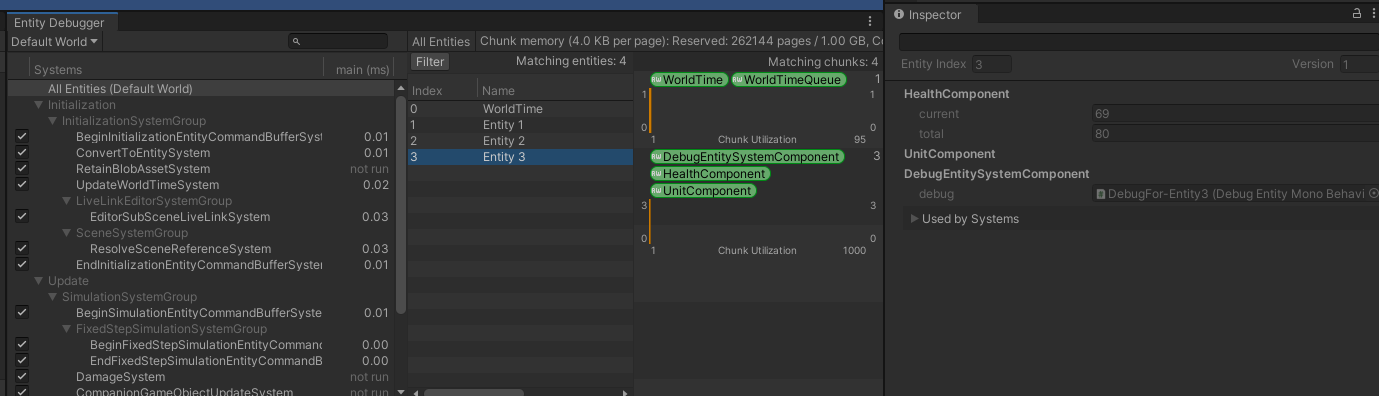
With the upcoming Unity ECS, GameObjects can still be used to design content with the GameObject conversion workflow. However, at runtime, once the conversion was processed, even though those values can be edited (if you decided not to destroy the GameObject after the conversion) in the Inspector Window, they will not be synchronized to/from the corresponding Entity.
To visualize Entities’ values there is a new window named Entity Debugger that shows all its Components’ values in readonly mode. It also shows which systems are processing that Entity given its current Components.
How to modify ECS values
In order to modify values using Unity ECS, custom tools have to be created. I want to share a possible way to do with the Unity’s Editor.
Note: In general, modifying values at runtime could be direct in some cases (change the current health) but in others it might need you to know internal game logic to avoid leaving an invalid state.
In a nutshell, the idea is to create one or more GameObjects per Entity, with one or more debug MonoBehaviours and, for each one of those, create a Custom Editor exposing interesting values and actions.
Here is an example of the result:

Defining the structure
Let’s start with the ECS Components:
// Tag to identify the entities we want to debug
public struct UnitComponent : IComponentData { }

// The component to debug in the Custom Editor
public struct HealthComponent : IComponentData {
  public int current;
  public int total;
}

// Another component to perform damage to an entity
public struct Damage : IComponentData {
  public Entity target;
  public int damage;
}
Here is the MonoBehaviour used as debug intermediary and to create the Custom Editor later:
public class DebugEntityMonoBehaviour : MonoBehaviour {
  // these are going to reflect the health value
  public float current;
  public float total;

  // the reference to the entity
  public Entity entity;
}
Creating debug GameObjects per Entity
In order to create a debug object per Entity we want to debug, we are going to use a ComponentSystem and a ISystemStateSharedComponentData.
// This one just stores a reference to the debug object
public struct DebugEntitySystemComponent : ISystemStateSharedComponentData, IEquatable<DebugEntitySystemComponent>
{
  public DebugEntityMonoBehaviour debug;

  public bool Equals(DebugEntitySystemComponent other)
  {
    return Equals(debug, other.debug);
  }

  public override bool Equals(object obj)
  {
    return obj is DebugEntitySystemComponent other && Equals(other);
  }

  public override int GetHashCode()
  {
    return (debug != null ? debug.GetHashCode() : 0);
  }
}

public class DebugEntitiesSystem : ComponentSystem
{
  protected override void OnUpdate()
  {
    // create the debug stuff...
    Entities
      // we check only for entities with UnitComponent which are the ones we are interest on.
      .WithAll<UnitComponent>()
      .WithNone<DebugEntitySystemComponent>()
      .ForEach(delegate(Entity entity)
      {
        var name = EntityManager.GetName(entity);

        if (string.IsNullOrEmpty(name))
            name = $"Entity{entity.Index}";

        var go = new GameObject($"DebugFor-{name}");

        var debug = go.AddComponent<DebugEntityMonoBehaviour>();

        PostUpdateCommands.AddSharedComponent(entity, new DebugEntitySystemComponent
        {
            debug = debug
        });
      });

    // update the debug stuff
    Entities
      .WithAll<UnitComponent, DebugEntitySystemComponent, HealthComponent>()
      .ForEach(delegate(Entity entity, DebugEntitySystemComponent debug, ref HealthComponent health)
      {
        debug.debug.entity = entity;
        debug.debug.current = health.current;
        debug.debug.total = health.total;
      });

    // destroy the debug stuff...
  Entities
    .WithAll<DebugEntitySystemComponent>()
    .WithNone<UnitComponent>()
    .ForEach(delegate(Entity entity, DebugEntitySystemComponent debug)
    {
      GameObject.Destroy(debug.debug.gameObject);
      PostUpdateCommands.RemoveComponent<DebugEntitySystemComponent>(entity);
    });
  }
}
This system will create a new debug GameObject for each Entity of interest (the ones with UnitComponent) that doesn’t have one yet, update it if it has one, and destroy it when the Entity was destroyed.
Creating the Custom Editor
Now that there is one debug GameObject per Entity with the DebugEntityMonoBehaviour, it is time to create the Custom Editor:
[CustomEditor(typeof(DebugEntityMonoBehaviour))]
public class DebugEntityInspector : UnityEditor.Editor
{
  public override void OnInspectorGUI()
  {
    var debug = target as DebugEntityMonoBehaviour;

    var entityManager = World.DefaultGameObjectInjectionWorld.EntityManager;

    EditorGUI.BeginChangeCheck();

    var newCurrent = EditorGUILayout.IntField("Current Health", debug.current);
    var newTotal = EditorGUILayout.IntField("Total Health", debug.total);

    EditorGUI.BeginDisabledGroup(true);
    EditorGUILayout.IntField("Percentage", debug.current * 100 / debug.total);
    EditorGUI.EndDisabledGroup();

    if (EditorGUI.EndChangeCheck())
    {
      entityManager.SetComponentData(debug.entity, new HealthComponent
      {
        current = newCurrent,
        total = newTotal
      });
    }

    if (GUILayout.Button("Perform Damage"))
    {
      var target = debug.entity;

      var damageEntity = entityManager.CreateEntity(ComponentType.ReadWrite<Damage>());
      entityManager.SetComponentData(damageEntity, new Damage
      {
        target = target,
        damage = 5
      });
    }

    if (GUILayout.Button("Destroy"))
    {
      var target = debug.entity;
      entityManager.DestroyEntity(target);
    }
  }
}
Here is how it looks like:
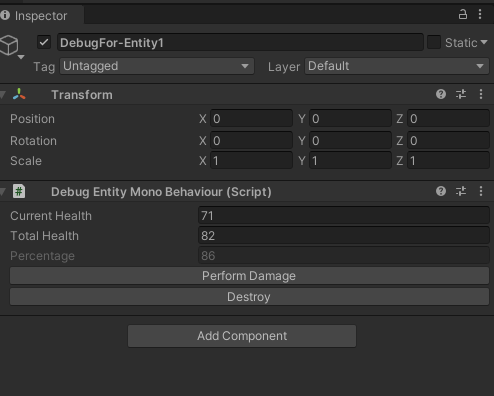
That’s it, now each time an Entity with a UnitComponent is created, the system will create a debug GameObject with the MonoBehaviour and start synchronizing values to show them in the Inspector. The CustomEditor will allow us to interact with ECS changing values or performing actions. Now new fields can be exposed and new actions can be created.
Watch again everything working together:
Extend using Gizmos
We can also use Gizmos to draw other interesting information in the Scene view. As example, I created a new AttackComponent with the attack range.
public struct AttackComponent : IComponentData {
  public float range;
}
Then modified the debug MonoBehaviour to support a new value and added the DrawGizmos method:
public class DebugEntityMonoBehaviour : MonoBehaviour
{
  // previous stuff ...

  public float attackRange;

  private void OnDrawGizmos()
  {
    if (attackRange > 0)
    {
      Gizmos.color = Color.red;
      Gizmos.DrawWireSphere(transform.position, attackRange);
    }
  }
}
And now extended the DebugEntitiesSystem with a new query to copy the attack range to the MonoBehaviour if there is an AttackComponent in the Entity.
  // ....
  Entities
    .WithAll<UnitComponent, DebugEntitySystemComponent, AttackComponent>()
    .ForEach(delegate(Entity entity, DebugEntitySystemComponent debug, ref AttackComponent attack)
    {
      debug.debug.attackRange = attack.range;
    });
  // ....
That will work, but all Gizmos are going to be drawn at 0,0, since our GameObjects are not considering the Entity’s position. Now, for that to make sense, we need to copy also the translation to the GameObject’s Transform, for that, I created another query:
  // ....
  Entities
    .WithAll<UnitComponent, DebugEntitySystemComponent, Translation>()
    .ForEach(delegate(Entity entity, DebugEntitySystemComponent debug, ref Translation t)
    {
      debug.debug.transform.position = t.Value;
    });
  // ....
So, for all Entities with Translation Component, the system will copy that value to the GameObject’s Transform.
Here is the result:
![]()
Pros
- We can take advantage of all Unity’s Editor tools, even accessing the UnityEditor API. For example, we could Handles to move an Entity with a Translation Component.
- Since you have to create the inspector logic by hand, in some cases game logic can be reused for some actions and avoid breaking the game by touching values directly that could leave an invalid state.
- It is super easy to implement (we are following a similar approach with my dev team).
- Expose what you want, and even make the exposure optional, like rendering values only if the Entity has or not a Component.
Cons
- Manually maintained, there is no auto generated inspector by default.
- Only usable in Unity’s Editor.
- Doesn’t scale so well, but I believe the automatic option (exposing all GameObject’s values) doesn’t either.
Conclusion
I like that you can’t easily edit ECS values through the Entity Debugger nor the Inspector and to have to make your own tools. In my experience, you normally don’t want to change every value at runtime, maybe you do read some values to check the current game state and maybe, for some specific cases, you want to change a value or take an action to test some behaviour. In some way, it reminds me the GDC talk about using different data schemas since the idea is to expose meaningful values to designers and debuggers which might involve some transformation in the middle.
Of course you can create a tool using reflection and automatically generating code to create these debug objects explained in the blog post but you will end up with tons of unused debug stuff and start working in a way to turn off unused values.
The technique presented here is a simple approach, might not scale so well but can be quickly implemented to have some visual tools to interact with the ECS World. I like it I would love to have this kind of tools in the builds and not only in the Unity’s Editor. I suppose a better approach could be to start creating tools integrated in the game depending a bit more to game concepts and logic. That solution could use Unity’s UI now that I think (I might try to work on that a bit and write another blog post).
In case you are interested in the code, here is the Github project used for this article.
It was a simple article but, as always, I hope you liked it and If you did, follow, retweet, like and or comment, thanks!!
Using Unity Prefabs and GameObjects only for data.
Introduction
GameObjects are the main concept of Unity, they are composed by different Components which normally contain both Logic and Data. A GameObject can contain other GameObjects as well in a hierarchical way.
Prefabs are GameObjects stored in assets that can be easily reused by instantiating them in scenes during edition time, for example, an enemy spawner in the right corner of the level, or in runtime, for example, the enemies spawned by that spawner.
Using Prefabs and GameObjects only for Data
When we want to store only data, we normally tend to use ScriptableObjects since it is a more natural way. They are just assets that can store anything serializable by Unity. ScriptableObjects are great and have some advanced usages explained here and here but this blog post is not about that.
It is not common, however, to use GameObjects and Prefabs for data only (no logic at all) but that doesn’t mean it is not useful, au contraire mon ami, and I will share why.
When using GameObjects and Prefabs with this perspective in mind, it is like using ScriptableObjects but with all these extra features:
- Data Composition by Hierarchical Structure
- Data Composition by Components
- In-Scene Data Customization
- Prefab Variants Data Customization
- Reuse Data with Nested Prefabs
- Prefabs Editor
- GameObjects default Components like Transforms
- Useful API methods
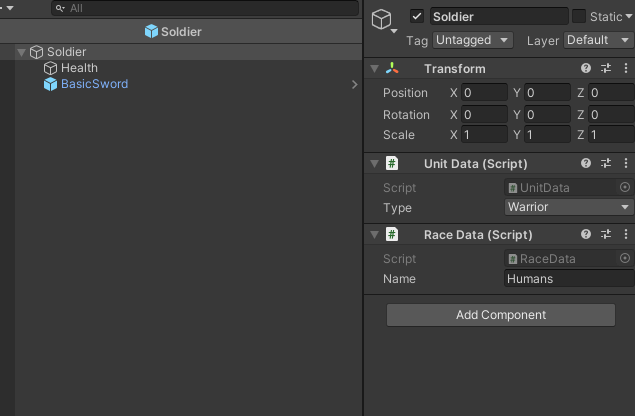
For the rest of the blog post I will refer to those GameObjects as Data GameObjects.
Data by using GameObject hierarchical structure
As GameObjects can be added one to another in a hierarchical way, we can store different Data together by just adding the corresponding Data GameObject to another.

Given the previous example, we can get data using something like this:
public void SomeLogic(GameObject dataObject) {
  var health = dataObject.GetComponentInChildren<HealthData>();
  // ... do something with the health
}
Data by adding GameObject’s Components
As I said before, GameObjects are composed of a list of Components, we can use that as well to store different Data together by just adding corresponding Components to the Data GameObject we want.
And with this example, we can do the same:
public void SomeLogic(GameObject dataObject) {
  var health = dataObject.GetComponent<HealthData>();
  // ... do something with the health
}
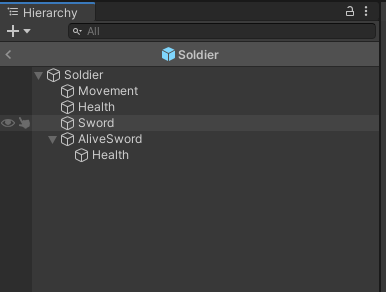
In-Scene Data Customization
ScriptableObjects can’t be stored in scenes but GameObjects can, and that opens new possibilities to Data customization.
In order to do that, Data GameObject can be created in scenes (or instantiated in the case they are stored in Prefabs) and modified as needed.
Prefab Variants Data Customization
If using Unity 2018.3 or newer, there is also the Prefab Variants feature for Data Customization as well, and simplify storing and reusing those modifications.
Reuse Data with Nested Prefabs
Nested Prefabs is also one of those new Prefabs features that allow reusing Data composition by adding other Data GameObject Prefabs as children.
Prefabs Editor
Now that Prefabs can be edited completely without having to instantiate them, we can take advantage of that too. This is super useful in the case of using the hierarchical Data composition mentioned before.
GameObjects default Components like Transforms
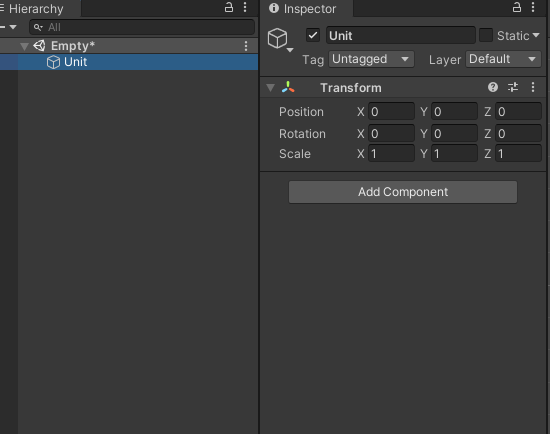
GameObjects normally come with a lot of extra burden, like the Transform Component for example, but that’s not always bad. Sometimes it is useful to have positional information in the Data GameObjects by using Transforms, for example, to spawn an enemy in a given offset.
![]()
public class SpawnerData : MonoBehaviour
{
    public Vector2 Offset =>
          transform.Find("Offset").localPosition;
}
Even though this means extra memory cost compared to using ScriptableObjects, it doesn’t mean extra performance cost since Data GameObjects are not instantiated and have no logic.
Useful API methods
As we are using GameObjects, we can also take advantage of all its related API methods like GetComponent methods, or checking for a Transform children to be there or not.
public void SomeLogic(GameObject dataObject) {
   if (dataObject.transform.Find("DoubleDamage") != null) {
     // perform double damage
   } else {
     // perform normal damage
   }
}
We could even use it to get MonoBehaviours implementing an Interface. Even though that is normally more useful for logic, we could have complex Data that depends on other factors, so it might be interesting to create an Interface and have different implementations to retrieve those values while ensuring readonly usage at the same time.
public interface WeaponData  {
   int Damage { get; }
}

public class BasicWeaponData : MonoBehaviour, WeaponData {
  public int damage;
  public int Damage => damage;
}

public class AdvancedWeaponData : MonoBehaviour, WeaponData {
  public int damage;
  public int level = 1;
  public int Damage => damage * level;
}
In case you are interested, here is the Github project used for this article.
Some drawbacks to have in mind
When using ScriptableObjects, it is super easy to pick a reference in the Editor since it shows only valid assets of that type. In the case of referencing GameObjects the editor will show all possible GameObjects in the scene or Prefabs in the assets database. You can’t even reference to specific Component type since, in that case, the editor shows nothing (unless you select something from the scene) and you’ll have to manually drag and drop the reference from the assets.
One common mistake when working with assets in runtime is to modify their values through code without knowing, and Prefabs are no exception. To mitigate this, we try to treat them as read only as possible. For example, we use them only in creation time or try to return immutable values by using structs or by using an interface like the previous example.
Conclusion
Using Prefabs and GameObjects for Data proved to be a great tool to easily reuse and customize Data by taking advantage of all of the GameObjects features mentioned before.
Having great Data tools is relevant when developing a game focused on Data that everyone in the team collaborate in building it. It helps when separating data for different purposes, for example, the Data edited by Game Designers and the Data optimized for the engine.
I know this blog post was a bit generic but it was to share the general idea behind this and present it in a clean way. Would love to share a more real example of how we are using it for our current game but I can’t.
As always, I hope you liked it, and feel free to comment and share :)
Using the new Unity's Input System during Ludum Dare 44 Jam
During Bankin’ Bacon development we ended up using both Unity’s legacy Input System and new Input System, and we wanted to share our experience with them.
We knew from the beginning we wanted to experiment with the new Input System but since we had no experience and we only had three days, we started by using only the legacy one.
Legacy input system
After prototyping a bit and iterating over the game concept, we decided we wanted to control everything Gamepads (using Xbox 360 Controllers) and the player would be able to do four actions, move (left stick), target (right stick), dash and attack.
For those actions, we created an input class that reads the Input and store their state so it can be used later by our character class. The code is something like this:
class UnitController : MonoBehaviour {

  Vector2 movementDirection;
  Vector2 fireDirection;

  bool isFiring;
  bool isDashing;

  UnitControllerAsset inputAsset;

  void Update() {
    movementDirection.x = Input.GetAxis(inputAsset.moveHorizontalAxis);
    movementDirection.y = Input.GetAxis(inputAsset.moveVerticalAxis);
    ...
    isFiring = Input.GetButtonDown(inputAsset.fire1Button);
    ...
  }
}
The Player’s prefab can be configured to use a specific set of Input keys by creating a UnitControllerAsset asset and assigning it to the controller. The asset looks like this:
class UnitControllerAsset : ScriptableObject {
  public string moveHorizontalAxis;
  public string moveVerticalAxis;

  public string fireHorizontalAxis;
  public string fireVerticalAxis;

  public string fire1Button;
  public string fire2Button;
}
In order to perform actions, our character class checks the state of the UnitController values and acts accordingly. For example:
class UnitCharacter : MonoBehaviour {
  UnitController controller;

  void Update()
  {
    transform.position += controller.movingDirection * speed * dt;
    if (controller.isFiring && cooldown) {
      FireProjectile(controller.fireDirection);
    }
    ...
  }
}
Note: this is an oversimplified code, the game’s code is super ugly.
From the Unity’s InputManager side, we created action keys for each player and configure them using different joystick numbers:

This was a hell to manage, I mean, it wasn’t so hard but it was super easy to make mistakes and not know where. To simplify a bit this task, we normally modify the ProjectSettings/InputManager.asset file directly using a text editor so we can do copy, paste and replace text.
Following this approach we quickly had something working for two players and if we wanted more players we would have just to copy the actions and configure some prefabs.
Mac/Windows differences
Since life is not easy, buttons and axis are mapped differently between Windows and Mac (at least with the driver we were using for Xbox 360 Controllers). To overcome this issue, we had to implement a hack to support different platform Input mapping. What we do is, we duplicate action keys for each OS and we read them differently on that. So, we end up having something like Player0_Fire1 for Windows and Player0_Fire1Mac for Mac (you can see that in the previous InputManager’s image) . Here is an example of the hack code:
void Update() {
  if (Application.platform == RuntimePlatform.OSXPlayer || Application.platform == RuntimePlatform.OSXEditor)
  {
      fx = Input.GetAxis(_inputAsset.fireHorizontalAxis + "Mac");
      fy = Input.GetAxis(_inputAsset.fireVerticalAxis + "Mac");
      firing1 = Input.GetButtonDown(_inputAsset.fire1Button + "Mac");
      firing2 = Input.GetButtonDown(_inputAsset.fire2Button + "Mac");
  }
}
We are not responsible if you want to use this code and your computer explodes.
By the end of the second day of development we had our Gamepads working and we were able to go from 2 to 4 players support by just adding the actions mapping for new players in the InputManager and creating some prefabs.
Even though that was working fine in the computer we were using for development, it didn’t on our personal computers at home and we didn’t know why.
New input system
Since we were worried that could happen to more people and we love livin’ on the edge (we used Unity 2019.1 for the game), we decided to spend the last day trying to improve our input issues by using the new Input System (whaaaaaaaat?).
We started by creating another project named LearnAboutNewInputSystem and importing the needed packages by following these installation steps. The idea was to iterate and learn about the API in a safe context and, only after we manage to do what we needed, integrate it in the game.
Once we had the project ready, we created an Input Actions asset with Create > Input Actions and configured some actions to start testing. Here is the asset configuration:

We specified a continuous axis Action, named Movement, that receives input from the Gamepad left stick and from the keyboard keys WASD. In order to react to that action, we created a GameObject with a PlayerInput MonoBehaviour and mapped to our custom MonoBehaviour methods using Unity Events.
PlayerInput inspector automatically shows Unity Events for each action you create on the Input Actions configuration asset:
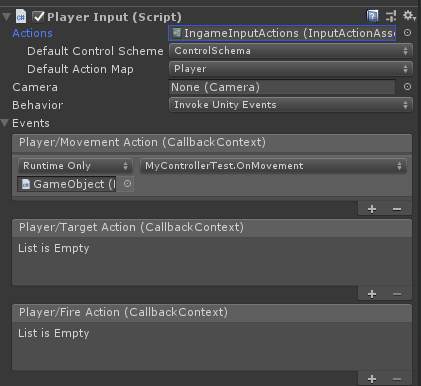
Note: it has a bug what adds same action multiple times each time it reloads code or something like that.
And here is our code to handle the action event:
public class MyControllerTest {
  public void OnMovement(InputAction.CallbackContext context) {
    var axis = context.ReadValue<Vector2>();
    Debug.LogFormat("Moving to direction {0}", axis);
  }
}
That worked well, however we started to see some possible problems. First, even though we received callbacks continuously for the Gamepad left stick, we only received callbacks for the keyboard when a key was pressed or released but not all the time as expected. Second, we didn’t know how to identify different Gamepads, so with the current test, each time a left stick on any connected Gamepad was moved, our callback was invoked.
Note: we didn’t know about the
PlayerInputManagerclass while developing the game. We tried using it now (while writing this blog post) but we detected also some problems.
By checking about new Input System in Unity’s Forums we found some people trying to do something similar and one dev suggested doing this and also checking the test cases for how to use the API. Following those recommendations, we managed to make our first version of multiple Gamepads support.
Here is the code:
public class MyPlayersManager : MonoBehaviour {
  InputUser[] _users;

  Gamepad[] _gamepads;

  void Start()
  {
    _users = new InputUser[4];
    _gamepads = new Gamepad[4];

    InputUser.listenForUnpairedDeviceActivity = 4;

    InputUser.onChange += OnControlsChanged;
    InputUser.onUnpairedDeviceUsed += ListenForUnpairedGamepads;

    for (var i = 0; i < _users.Length; i++)
    {
      _users[i] = InputUser.CreateUserWithoutPairedDevices();
    }
  }

  void OnControlsChanged(InputUser user, InputUserChange change, InputDevice device)
  {
    if (change == InputUserChange.DevicePaired)
    {
      var playerId = _users.ToList().IndexOf(user);
      _gamepads[playerId] = device as Gamepad;
    } else if (change == InputUserChange.DeviceUnpaired)
    {
      var playerId = _users.ToList().IndexOf(user);
      _gamepads[playerId] = null;
    }
  }

  void ListenForUnpairedGamepads(InputControl control)
  {
    if (control.device is Gamepad)
    {
      for (var i = 0; i < _users.Length; i++)
      {
        // find a user without a paired device
        if (_users[i].pairedDevices.Count == 0)
        {
          // pair the new Gamepad device to that user
          _users[i] = InputUser.PerformPairingWithDevice(control.device, _users[i]);
          return;
        }
      }
    }
  }
}
What we do here is to listen for any raw event, for example pressing a button, from unpaired Gamepads and pair them with users without paired devices.
In the Forums, they also recommend creating a new instance of the Input Actions asset for each user, we tested that and worked somehow but we realized we didn’t need it for the game so we decided to just read the Gamepad values directly.
Integrating it in Bankin’Bacon
To integrate it in the game and be able to use it in any scene, we created a Singleton named UnitNewInputSingleton, using a ScriptableObject, initiated the first time it was invoked. Each time we want to know the state of a Gamepad for a user, we add a dependency to the asset and use it directly from code.
To implement a new controller using the new input, we first created an abstract class for the UnitController and then created a new implementation using a reference to the UnitNewInputSingleton to ask for the raw data of the Player’s Gamepad. Here is the code of the new input:
public class UnitControllerNewInput : UnitControllerBaseInput {

  [SerializeField]
  private UnitNewInputSingleton _inputMaster;

  [SerializeField]
  private UnitControllerInputAsset _keyboardControls;

  private Vector2 _moveDirection;
  private Vector2 _targetDirection;

  public override Vector3 MoveDirection => new Vector3(_moveDirection.x, 0, _moveDirection.y);
  public override Vector3 FireDirection => new Vector3(_targetDirection.x, 0, _targetDirection.y);

  public override bool IsFiring1 { get; set; }
  public override bool IsFiring2 { get; set; }

  private int _inputPlayerId;

  private void Start()
  {
    _inputPlayerId = _inputMaster.RegisterPlayer();
  }

  private void Update()
  {
    _moveDirection = new Vector2();
    _targetDirection = new Vector2();

    var gamepad = _inputMaster.GetGamepad(_inputPlayerId);

    if (gamepad != null)
    {
      _moveDirection = gamepad.leftStick.ReadValue();
      _targetDirection = gamepad.rightStick.ReadValue();
      IsFiring1 = gamepad.rightShoulder.wasPressedThisFrame || IsFiring1;
      IsFiring2 = gamepad.leftShoulder.wasPressedThisFrame || IsFiring2;
    }
  }
}
Since we had access to the raw input, on some scenes where we just wanted to know if any Gamepad button was pressed, we iterated over all the Gamepads. This was used to restart the game for example.
var start = _inputMaster.Gamepads.Any(g => g != null && g.startButton.wasReleasedThisFrame);
var select = _inputMaster.Gamepads.Any(g => g != null && g.selectButton.wasReleasedThisFrame);

if (start)
{
    OnGameRestart();
} else if (select)
{
    SceneLists.Load().LoadMenu();
}
If you want to see more about one day solution code check the game Gitlab page.
Finally
Even though Legacy Input System works for quickly prototyping, it is really limited to do Gamepads support and it sucks in terms of configuration. It even doesn’t support remap joystick actions using the default Unity’s Launcher Window.
The new Input System is looking better already but we believe it still has a lot of issues to fix and probably not ready for production. It also has some strange design decisions (in our humble opinion) like having split screen stuff in the API and configuration scripts. The API should be clean and provide low level control and then there should be optional packages to do more stuff depending the game.
We hope they keep working and improve it as much as possible and release a stable version soon.
The making of Bankin' Bacon: A dev experience we can take to the piggy bank
We want to share a bit about the game we did for Ludum Dare Jam #44 last weekend, it’s named:
Made by:
- Ariel Coppes (@arielsan)
- Enzo Gaiero (@playorbust)
- Rubén Garat (@rgarat)
- Anthony García (@thonyg09)
Links
And now a bit of dev story by our friend Enzo.
Dev Story
Initially, when we heard about the theme Your life is currency we were a bit bummed since we were set on doing a roguelike shoot em’ up game and were not so sure how to fit the theme into the mechanics, however, after a few cups of coffee and a brainstorming session around the whiteboard we ended up coming with the idea that would flesh out to be Bankin’ Bacon.

Initial ideas on character concept.
We discussed using lifesteal mechanics, simply addressing the theme through art assets, using HP for upgrades (but adding a lot of upgrades would take time away from polishing) and more. Eventually we ended up going for the idea of having HP being your ammo and the price to pay for every skill.
Once the core idea behind the mechanics was settled, we needed a main character. We tossed around many ideas like a gold golem being chased by dwarves, bankers throwing money stacks at each other but chose to go with a lovable character that would fit the theme perfectly… A piggy bank that shoots its own coins.

Our characters are taking shape.
A few hours later our awesome artist had this bouncy fella ready for integrating.
So, now that the character was settled and that the artist was working on the environment art we had to fully define the game’s mechanics.
Since we have some game jams under our belt we’ve learnt the hard way that the best way to address features during a jam is to have the ideal game in mind and the minimum viable product (MVP) to call it a closed game. Then, start building the MVP and polish our way on top of that.

Terrain and colors concept.
Our main goal was to make a game that would deliver a fun couch multiplayer experience but instead of shooting like crazy you’d have to be frugal about it and make your shots count, after all… Your life is currency.
In order to make the players play frugally, we needed mechanics that would encourage that sort of play.
Planned mechanics that made it into the game :)
- Shooting does self damage to the shooter.
- Getting hit does more damage than shooting. (so shooting would make sense)
- Players die if getting shot drops their HP below zero.
- Dashing makes you invulnerable but costs HP.
- Players with no coins won’t be able to shoot. (So you can’t die from shooting.)
Planned mechanics that didn’t make it into the game :(
- Starting out with 50% max HP
- Dashing into coins would steal the coin shot.
- Player scale would vary according to HP. (so that the winning player would have a bigger hit box)
- Player speed would vary according to HP. (So that the losing player would be faster)
- Different coin values (i.e. quarters, nickels, pennies, etc.)
Why mention the mechanics that didn’t make it into the game? Well, to convey the whole “ideal game vs MVP” when it comes to jam development and also to explain the reason behind adding a new mechanic, coin dropping.
Even though we managed to make the game encourage players to be frugal about shooting and dashing, we were encouraging players not to do anything that was fun in the game, therefore, we needed a way to keep the coins around so players could keep playing, but doing regular powerup drops would inflate the game’s economy, thus, making about 80% of the coins used drop around the level was the right way to go.
When it comes to level design, we started by trying out Unity’s Probuilder, which came in handy for prototyping really complex levels with tunnels and nooks to hide in that would turn the game into more of a hide n’ seek type of play, but two issues came up from doing that:
- The camera needed for using tunnels and the like was a bit hectic for the type of game and stretched the art assets, so we ended up switching to a fixed camera.
- Doing that sort of levels would require an amount of art assets that would be impossible to make during a jam without sacrificing the art standards.
However, even though we didn’t use assets made in Probuilder, it played a crucial role alongside Progrid for testing out level sizes, prototypes and ultimately assembling the level with the final assets. After several iterations using complex designs, simple levels with little obstacles proved to be the way to go leaving more time for polishing the environmental decoration.
In conclusion, the overall experience was more than satisfactory, leaving us with a somewhat polished game that could provide plenty of fun couch multiplayer experiences.
To finish up, we leave you a longer gameplay video, enjoy!
Thanks for reading!