Dassault Dev Diary 2 - Animations
As I said on the last post, I want to talk about how animations were implemented in Dassault.
In the original game, droids are animated using one image for each frame of the animation. Those images could be all in a single file or not. Here is an example of an animation:

This solution could be expensive for Dassault because droids are rendered in several layers, so to animate a droid we need to animate each droid’s layer.
Another solution, and the one used in Dassault, is to separate the droid in parts to create a hierarchy and then animate those parts by moving them inside the game.
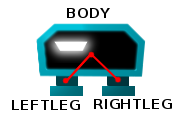
For Dassault, the droids are separated in three parts, the body and the two legs:

And here is an example of how the parts are related to the droid:
droid {
   body {
     position (0,0)
   }
  leftleg {
     position (-5,5)
   }
  rightleg {
     position (5,5)
   }
}
Where each part position is relative to the droid’s position.
To perform the animation, given a specific time, we calculate the value of a property by interpolating the values of two key frames.
For example, we could animate the value of the position of the leftleg part by specifying that on 0ms it should be (0,0) and on 100ms it should be (0,-10) so, when the time is 50ms the position would be (0,-5).
Here is an example of how the animation could be specified:
walk {
  body.position {
    time 0 (0,0)
    time 200 (0,-5)
    time 400 (0,0)
    time 600 (0,-5)
    time 800 (0,0)
  }
  leftleg.position {
    time 0 (0,0)
    time 200 (0,-5)
    time 400 (0,0)
    time 800 (0,0)
  }
  rightleg.position {
    time 0 (0,0)
    time 400 (0,0)
    time 600 (0,-5)
    time 800 (0,0)
  }
}
And here is a video showing how it looks inside the game:
This example shows how to animate positions, with the same ideas you could animate an angle, colors, alphavalues, etc.
Next time, I want to talk about collision techniques used for Dassault.
