Simulating parallax scrolling for 2d game
In this post we want to share how we simulated parallax scrolling in Vampire Runner, a simple technique that could be used in any 2d game.
Introduction
The basic idea to simulate parallax is to work with different render layers and to move them at different speeds.
To easily understand the post, we will work with a basic example based on Vampire Runner graphics where we have three layers, the first layer is the background which is static, the second layer are the mountains and the third layer is the world layer where the main character runs.
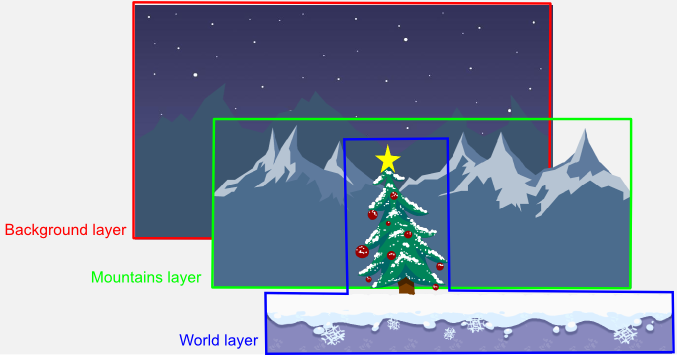
In Vampire Runner, the main character is the center of the world, despite being running, he is in a fixed position on the screen while all the other objects move accordingly to give the correct idea.
To simulate the parallax, each layer of objects moves at different speeds to give the correct idea of depth. In case of Vampire Runner, the background layer is static, the mountains layer moves at 1/12 the speed of the main character and the world layer moves at the speed of the main character.
Simulating movement with cameras
We said before that the character is in a fixed position on the screen, however the real entity of the character is moving around the world, even more, he is running!.
To simulate him being in a fixed position, we have a camera following the character, so the player always see the character in the same position.
However, as all the other objects (obstacles, trees, etc) have a fixed position in the world when the camera follows the main character they move in the opposite direction. That is how we move the world layer and the mountains layer. The only difference is we move the mountains layer camera slower.
In conclusion, we have one camera for each layer and two of them move following the main character.
Using OpenGL model view matrices to configure the cameras
As we are using OpenGL through LibGDX (and LWJGL on desktop), we need to translate all the previous camera behavior to OpenGL.
In OpenGL, to simulate a world camera what you typically modify the model view matrix and then render the objects.
So, for Vampire Runner, we had three different matrices to render each layer, and the render method was something like this:
  1.1 configure background layer camera
  1.2 render background layer

  2.1 configure mountains layer camera
  2.2 render mountains layer

  3.1 configure world layer camera
  3.2 render world layer
In the update method we only had to update the cameras depending on the character position.
To simplify the work, if you are using LibGDX, you can use the Camera class which comes with a proper class for 2d games named OrthographicCamera. In our case we used a custom implementation which provided a nicer API to work with.
Conclusion
Working with different cameras with OpenGL is not so hard and it let you achieve a correct feeling when moving across the world.
As always, hope you like the post.