Lighting Bolts Effect
Some time ago I made a lighting bolt effect in Java, using Slick2D library, following the tutorial of Drilian’s House of Game Development. My results:
If you are looking to make a nice lighting bolt effect for your game, I recommend you to follow the original tutorial.
Here is my code if you want to use it and/or modify it:
package com.gemserk.commons.tests;

import static org.lwjgl.opengl.GL11.*;

import java.util.ArrayList;
import java.util.Collection;
import java.util.Random;
import java.util.concurrent.Callable;

import org.newdawn.slick.AppGameContainer;
import org.newdawn.slick.BasicGame;
import org.newdawn.slick.GameContainer;
import org.newdawn.slick.Graphics;
import org.newdawn.slick.Input;
import org.newdawn.slick.SlickException;
import org.newdawn.slick.geom.Line;
import org.newdawn.slick.geom.Vector2f;
import org.newdawn.slick.opengl.SlickCallable;

public class LightingBoltTestTemporal extends BasicGame {

	public LightingBoltTestTemporal(String title) {
		super(title);
	}

	public static void main(String[] arguments) throws SlickException {
		AppGameContainer app = new AppGameContainer(new LightingBoltTestTemporal("Name");
		app.setDisplayMode(320, 240, false);
		app.setAlwaysRender(true);
		app.setMinimumLogicUpdateInterval(1);
		app.setShowFPS(true);
		app.start();
		return app;
	}

	public static class LightingBoltEffect {

		Collection<Line> segments;

		int totalTime;

		int currentTime;

		private float lineWidth;

		public LightingBoltEffect(int time, Collection<Line> segments, float lineWidth) {
			this.totalTime = time;
			this.segments = segments;
			this.currentTime = time;
			this.lineWidth = lineWidth;
		}

		public void update(int delta) {
			currentTime -= delta;
			if (currentTime <= 0)
				currentTime = 0;
		}

		public void render() {
			float alpha = (float) currentTime / (float) totalTime;
			glPushMatrix();
			glColor4f(alpha, alpha, alpha, alpha);
			glLineWidth(lineWidth);
			glBegin(GL_LINES);
			{
				for (Line segment : segments) {
					glVertex(segment.getStart());
					glVertex(segment.getEnd());
				}
			}
			glEnd();
			glPopMatrix();
		}

		public boolean isDone() {
			return currentTime <= 0;
		}


		public void glVertex(Vector2f v) {
			glVertex3f(v.x, v.y, 0);
		}

	}

	@Override
	public void init(GameContainer container) throws SlickException {
		generateLightingBolt(new Vector2f(50, 240), new Vector2f(290, 240), 100);
	}

	protected void generateLightingBolt(Vector2f p0, Vector2f p1, int duration) {
		Collection<Line> segments = new ArrayList<Line>();

		segments.add(new Line(p0, p1));

		float offset = 200f;
		double probability = 0.3; // probability to generate new partitions
		float height = 50.0f;

		Random random = new Random();

		int partitions = 4;

		for (int i = 0; i < partitions; i++) {

			Collection<Line> newSegments = new ArrayList<Line>();

			for (Line segment : segments) {

				Vector2f midPoint = segment.getStart().copy().add(segment.getEnd()).scale(0.5f);

				Vector2f perpendicular = midPoint.copy().add(90);
				perpendicular.normalise().scale(random.nextFloat() * offset - (offset / 2));
				midPoint.add(perpendicular);

				if (random.nextFloat() < probability) {
					// generate new branch
					Vector2f direction = midPoint.copy().sub(segment.getStart());
					direction.add(random.nextFloat() * height);
					newSegments.add(new Line(midPoint.copy(), midPoint.copy().add(direction)));
				}

				newSegments.add(new Line(segment.getStart().copy(), midPoint.copy()));
				newSegments.add(new Line(midPoint.copy(), segment.getEnd().copy()));
			}

			segments = newSegments;

			offset /= 2;
		}
		lightingBoltEffect = new LightingBoltEffect(duration, segments, 2.0f);
	}

	private LightingBoltEffect lightingBoltEffect;

	@Override
	public void update(GameContainer container, int delta) throws SlickException {
		lightingBoltEffect.update(delta);
		if (!lightingBoltEffect.isDone())
			return;

		Input input = container.getInput();
		if (!input.isMouseButtonDown(Input.MOUSE_LEFT_BUTTON))
			return;

		int mouseX = input.getMouseX();
		int mouseY = input.getMouseY();

		Random random = new Random();
		int duration = random.nextInt() % 600 + 100;
		generateLightingBolt(new Vector2f(mouseX, mouseY), new Vector2f((mouseX + 300), mouseY), duration);
	}

	@Override
	public void render(GameContainer container, Graphics g) throws SlickException {
		SlickCallable.enterSafeBlock();
		lightingBoltEffect.render();
		SlickCallable.leaveSafeBlock();
	}
}
Animation4j Project Introduction
Some time ago I started an internal project to simplify working with animations and transitions when making games in Java.
It was used in some of our games, for example ZombieRockers to make different kind of effects like fade in/out of screens or the points messages when scoring, or in JSnakes to make camera effects like zoom in/out, camera movement, etc.
After using it on our games, it became more clear what kind of things are possible with it.
Now that we are using Github for our source code, we started a dedicated project named animation4j with all the stuff related with animations.
This video shows some working examples of the project:
You can download a runnable jar to test the features shown in the video.
The project is on development, so right now there are a lot of things to improve starting by making easy to understand examples.
I plan to add more posts explaining some design decisions and showing how to use the library.
Hope Java developers could find some use for it.
JNLP Downloader Tool
Some time ago, Rubén wrote a Java based tool to download all JNLP resources and prepare executable files to run it based on the JNLP file values.
It downloads all the resources specified by the JNLP file and save them into /libs and /natives for jar resources and nativelib resources respectively, in the second case it creates sub folders for each platform (Windows, Mac and Linux). After that, it creates one executable script file to run the application for each platform, configuring classpath and java.library.path inside it.
For example, running the tool:
java -jar jnlpdownloader.jar example http://www.example.com/application.jnlp
where the JNLP contents are:
<?xml version="1.0" encoding="utf-8"?>
<jnlp spec="1.0+" codebase="http://www.example.com/" href="application.jnlp">
    <information>
            <title>Some Title</title>
            <vendor>Some Vendor</vendor>
            <description>Some Description</description>
    </information>
    <resources>
            <jar href="slf4j-api-1.5.8.jar" />
            <jar href="google-collections-1.0.jar" />
            <jar href="lwjgl-2.4.2.jar" />
    </resources>
    <resources os="Windows">
            <nativelib href="lwjgl-2.4.2-natives-win.jar" />
    </resources>
    <resources os="Linux">
            <nativelib href="lwjgl-2.4.2-natives-linux.jar" />
    </resources>
    <resources os="Mac">
            <nativelib href="lwjgl-2.4.2-natives-mac.jar" />
    </resources>
    <application-desc main-class="Main" />
</jnlp>
will create the next file structure:
./example
./example/natives
./example/natives/Linux
./example/natives/Linux/liblwjgl.so
./example/natives/Windows
./example/natives/Windows/lwjgl.dll
./example/natives/Mac
./example/natives/Mac/liblwjgl.jnilib
./example/libs
./example/libs/google-collections-1.0.jar
./example/libs/slf4j-api-1.5.8.jar
./example/libs/lwjgl-2.4.2.jar
./example/run-windows.bat
./example/run-macosx.sh
./example/run-linux.sh
More info at the project’s home page.
We used this tool mainly to take a snapshot of a deployed Java Web Start application to make it run offline, for demo purposes.
Slick2D Contest
Some of the Slick2D folks are organizing a new game contest on slick forums, here is the contest poster:

We are thinking in joining the contest, mainly because we want to test some new frameworks and libraries, and to make some new games too. Well, we also want those Magicka keys to play it :D.
SVG Path Traversal in Java
Because some people asked, in this post we are going to explain in some detail how we do the balls movement in Zombie Rockers. All this work could be useful for other kind of games using paths like, for example, a tower defense.
For Zombie Rockers (we have to change that name), we defined a Path as an ordered collection of points. Simplifying our Path class, it could be something like this:
class Path {
    ArrayList<Vector2f> points;
}
note: we are using Vector2f provided by Slick2D
To easily traverse a path, we created the class PathTraversal, which let us move forward or backward through the path. For example, we could start in the beginning of a path built by three points: (100,100), (200, 100) and (300, 100). Then, if we advance 50 units, then we are going to be on the coordinate (150, 100), between first and second point.
note: when we say units, could be anything you need, pixels, meters, etc, it is not important for the example.
The idea of the PathTraversal in the future is to support any kind of paths, for example, one made using Bézier curves instead only a list of points.
This shows the API of the PathTraversal:
class PathTraversal {
    // the path we are traversing
    Path path;
    // the distance to the origin we are right now
    float getCurrentDistance();
    // go back the specified distance
    void backward(float distance);
    // go forward the specified distance
    void forward(float distance);
    // returns a point based on the current distance
    Vector2f getPoint();
}
You can create the Path in the way you want, for Zombie Rockers we are using SVG files to store the paths for each level and we are loading it using SVG Salamander project. First we create a AWT Shape using the Path class provided by the SVG Salamander, then we use a PathIterator to build the points we need to create our Path.
public List<Vector2f> loadPointsFromSVG(URI fileUri) {
	ArrayList<Vector2f> points = new ArrayList<Vector2f>();
	SVGDiagram diagram = SVGCache.getSVGUniverse().getDiagram(fileUri);
	SVGElement element = diagram.getElement(pathName);
	List vector = element.getPath(null);
	com.kitfox.svg.Path pathSVG = (com.kitfox.svg.Path) vector.get(1);
	// get the AWT Shape
	Shape shape = pathSVG.getShape();
	// iterate over the shape using a path iterator discretizing with distance 0.001 units
	PathIterator pathIterator = shape.getPathIterator(null, 0.001d);
	float[] coords = new float[2];
	while (!pathIterator.isDone()) {
	pathIterator.currentSegment(coords);
	points.add(new Vector2f(coords[0], coords[1]));
	pathIterator.next();
	}
}
To create the SVG path, you can use any program you want, in our case we are using mainly Gimp, we tried using Inkscape too but as we are creating the levels using Gimp it was easy to do all the work using the same application. So, open Gimp, create a path and then export it to a SVG file. Then, it should be ready to be loaded by SVG salamander inside your code.
A working example of this technique is shown in the next video of Zombie Rockers:
Conclusion
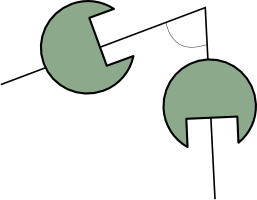
This solution works well while you avoid making the angle of two consecutive segments too sharp. For example, right now when balls traverse between two segments where the angle is too sharp, they will change the render direction too quickly and doesn’t looks so good.

Figure 1: The problem of SVG Path when the angle of two consecutive segments is too sharp.
One solution to reduce this, is to increment the points of the path when making a discrete version of the path, so you will have more intermediate points, then less angle brusque changes.
Another solution is to use a smooth change for the rendering direction, so when you change the value of the render direction, it will change smoothly over time.
Hope it could be of help.
Update: Added figure for the problem of the angles between segments.
Update2: Added links to the current implementation of Path and PathTraversal classes.
Update3: Fixed the path example.
