Improving how we show our games
Some people told us that our games where hard to find on the blog so we are working on making finding them easier. In order to do that, we first created a new button Games to let you find our games easily. It should be on the right sidebar, do you like it?
![]()
Also, as we have a lot of games right now, updating the Games page manually is quite annoying. To improve that, we created a basic WordPress plug-in named wp-games-gallery which creates a simple gallery of games based on each game page meta data. So now, each time we create a new game page, the games list should be updated properly.
Face Hunt v1.0.6 - Update
We have updated Face Hunt on Android Market again, adding the following changes:
- Added remote highscores with a Highscores screen.
- You can now specify your profile username on main menu screen.
- Fixed some resolution bugs when showing Tutorial text on small and medium devices.
- Red faces now do no damage when they are invulnerables but when vulnerables they do 2x previous damage.
- Red faces status change times are random now.
- Added new friendly white face which will recover your life for a while, but it will do a lot of damage if you kill it.
And here a list of probably next stuff to work on:
- Local high scores to let you record your scores even if you are internet-less
- Different high scores categories like daily/weekly/monthly/all like Jumping Slime does.
- Power ups like explode all enemies or recover health, etc.
- See how we can add some Ads to the game
Hope you like it.
Face Hunt v1.0.5 - Update
We have updated Face Hunt on Android Market adding some new stuff to try to improve fun when playing it. The next video shows the changes:
Here is the change log:
- Added new types of faces, a green one that moves random and a red one which becomes immortal for a while.
- Added a Tutorial to teach you about each type of enemy
- Now instead having two lives which you lose when a face disappears, you have a health bar which is reduced while faces are alive, so you have to kill them quick in order to survive longer.
- Modified the game to use physics so the enemies now hit each other
- Added particle effects when you hit an enemy
- Added menu screen to choose between different game modes.
Hope you like it.
Animation4j - Synchronizer
In this post I will talk a bit more about animation4j project, particularly the Synchronizer class.
When working with transitions we could want to declare them in a seamlessly way. In a previous post I introduced the [Transition
Meet the Synchronizer
For this reason, animation4j provides a class named Synchronizer, which handles all the synchronization internally for you. To create a new transition you have to declare something like this:
// create a synchronizer in some part of your initialization code
Synchronizer synchronizer = new Synchronizer();

// create a transition in some parte of your game logic, for example when the user press something
Vector2f position = new Vector2f(100, 100);
synchronizer.transition(position, Transitions.transitionBuilder().end(new Vector2f(200, 200)).time(500));

// this will perform the synchronization, it will set to my object the current value of the transition.
// normally this call will be on an update() method of your game
synchronizer.synchronize(delta);

// so now my object will be update with the new values
System.out.prinln(position);
note: I used a Vector2f class in the example because it is a known class, all libraries have a Vector implementation.
In the previous example, I create a transition of a Vector2f class from (100,100) to (200, 200) in 500ms.
To register a new transition to be synchronized you call transition() method and each time synchronize(delta) method is called, Synchronizer will perform synchronization of all registered transitions. The registration method comes in to flavors, one will modify the object you pass but it only works if you are using a mutable object. The other one works over the field of an object using reflection and calling public set method to modify the internal field. It works for both mutable and immutable objects because it is setting a new value each time, however, one pending improvement is to modify current field value, instead creating a new one each time, when the field class is mutable.
Synchronizer class could be used in a static way using the Synchronizers class, which holds an internal singleton instance to do all the work. That is really useful when you want to use the synchronization stuff wherever you want. However a restriction is that it will updates all registered transitions and that could be a problem if you have different states for your game, for example, a pause game state which keeps rendering a playing game state, you don’t want the transitions started in that state to go on, so in that case could use different instances for each game state.
TransitionBuilder is your friend
Another interesting stuff added to the library is the TransitionBuilder class provided inside the Transitions class. In previous versions, there were different methods to create a Transition using the Transitions factory class, one only specifying speed, other specifying speed and end value, other specifying speed and the interpolation functions, and the list goes on and on. In order to improve this, the TransitionBuilder class was created. It lets you specify the parameters you want when building a Transition, for example:
Transition transition = Transitions.transitionBuilder().start(v1)
	.end(v2)
	.time(5000)
	.functions(InterpolationFunctions.easeIn(), InterpolationFunctions.easeOut())
	.build();
The previous code will create a transition from value v1 to value v2 in 5000ms using the declared interpolation functions to interpolate between the internal values of v1 and v2 (as explained in a previous post).
These classes simplify a lot working with animation4j but there is still a lot of work to do in order to improve usage and internal performance.
Using Inkscape as Scene Editor
On a previous blog post</a>, I wrote about how are we using Inkscape as a Scene Editor for Archer Vs Zombies. Now, I want to talk a bit more about it. The post was going to be a dev log about Archer Vs Zombies but since it is about general Inkscape stuff for games, the original name lost its meaning.
First, I want to share a video showing how changes made in Inkscape are being reflected when the game loads.
note: some of the rocks were moved.
Creating Physics Object
As I probably said before, we are using Box2D to do physics behavior on our games. Box2D provides a way to define bodies based on circle or polygon shapes. Circle shapes are defined by a center and a radius and polygon shapes are defined by a list of vertices with some restrictions explained in Box2D manual.
On the other hand, SVG specification provides a way to specify paths which are used to describe straight lines or curves.
Then, I am creating SVG paths, when building the scene, in a separated Inkscape layer (named Physics) which could be parsed later inside the game to create Box2D polygon shapes. Having a separated layer for those shapes simplify the scene load process and, when working on Inkscape, provides a way to hide or show shapes definitions layer to easily work on the others.
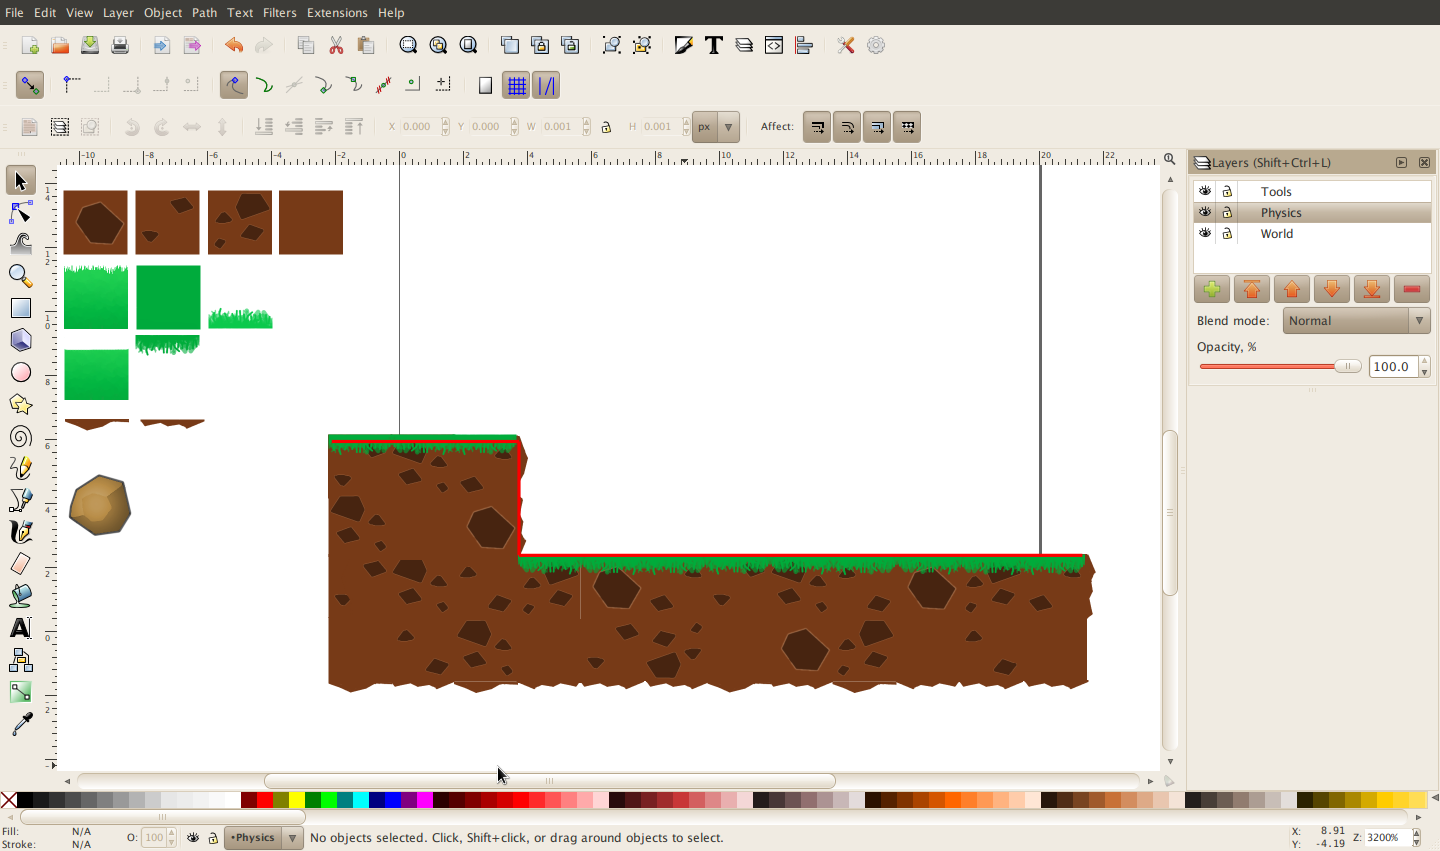 The image shows the polygons of the Physics layer in red color.
Using XML Data to define Physics Bodies properties
One thing we could need in the future is to define more stuff about physics bodies like if they are static or dynamic, their mass, density and others. As said on the previous post</a>, we could add custom XML data to XML nodes of the SVG file and process it when parsing the SVG inside the game to define those properties. For now, I am treating all SVG paths from the Physics layer as static bodies with no properties.
Parsing the SVG - Second part
I wanted to give a second chance to both SVG Salamander and Batik but the main reason to discard them is because both libraries depends on AWT classes and that doesn’t work on Android.
In the end, I am using my own and incomplete parser implementation based on Slick2D SVG Parser classes with a lot of modifications because I am not using Slick2D Vector2f and Transform classes and because its doesn’t handle SVG images.
Conclusion
After all that work, I feel comfortable working with Inkscape as a Scene Editor and I don’t feel the need to implement our own for now. Also, in my opinion, it is similar to Aquaria Scene Editor</a> as you can add sprites, rotate and scale them, move from one layer to another, etc, with limitations like you cannot test the scene until you load it in your game, between others.
Thats all for now, hope you like it.