Sharing code between Unity projects
Over the last months, I was researching, in my spare time, some ideas to reuse code between Unity projects. I was mainly interested in using generic code from Iron Marines in multiple projects we were prototyping at Ironhide.
The target solution in mind was to have something like NPM or Maven where packages are stored in a remote repository, and you can depend on a version of them in any project by just adding a configuration.
Some time ago, Unity added the Unity Package Manager (UPM) which does exactly that, it automatically downloads a list of packages given a dependency configuration. I was really excited with this solution since it goes along the direction I wanted.
Note: to know more about dependency management follow this link, even though it is about specific dependency manager, it gives the global idea of how they work.
Workflow
So, a good workflow would be something like this.
Imagine there are two projects, project A and project B and the first has some useful code we want to use in the second.
In order to do that, project A must be uploaded to the dependency system and tagged with a specific version to be identified, for example, version 0.0.1.
Then, to import that code in project B, we just add a dependency in the package dependency declaration.
{
  "dependencies": {
    "com.gemserk.projectA": "0.0.1"
  }
}
Suppose we keep working on the project B while someone working on another stuff added a new functionality to project A, and we want it. Since the new feature was released in version 0.0.5 of project A, we need to update the package dependency declaration to depend on it, like this:
{
  "dependencies": {
    "com.gemserk.projectA": "0.0.5"
  }
}
And that will download it and now project B can access the new feature. That is basically a common workflow.
Since we aren’t Unity, we can’t upload our code to their packages repository (yet?). However, there other are ways to declare dependencies stored elsewhere.
Depend on a project in the local filesystem
UPM supports depending on a project stored in the local filesystem like this:
{
  "dependencies": {
    "com.gemserk.projectA": "file:../../ProjectA/"
  }
}
For example, project A is stored in a sibling folder to project B.
/Workspace
  /ProjectB
    /Packages
      manifest.json
  /ProjectA
Note: There is a great Gist by LotteMakesStuff about this topic and more (thanks Rubén for the link).
This approach has the advantage of using local projects with any structure, stored anywhere (Git or not, more on that later). It even allows depending on a sub folder of project A, so project A could be a complete Unity project with lots of stuff (test scenes, testing assemblies, etc) but project B only depends on the shared code.
It needs all developers to use a similar folder structure for all the projects and download all of them together to work. Transitive dependencies is not supported by UPM following this approach, so if project A depends on project Zero, project B would never automatically find out.
It has some unexpected behaviors in code, at least in Visual Studio, when editing project A (add new code, refactor, etc) by opening project B solution through Unity. That’s is probably a side effect on how they create the VS solution or may be just a bug.
It doesn’t support versioning. Each time project A is modified, project B will automatically know about the change. This could be an issue if project A changed its API and we don’t want to (or can’t) update project B yet.
Depend on a Git project
Another option is to use a link to a Git project, like this:
"dependencies": {
  "com.gemserk.projectA": "https://github.com/gemserk/projectA.git",
}
Dependencies can be stored directly in Git projects (in Github or any other Git server). It supports depending on a specific commit, branch or tag to simulate versioning, but changing versions should be done by hand since UPM doesn’t show the list of versions like it does with Unity packages.
Since it looks at the root folder, a different Git project is needed for each dependency. This is not necessary a bad thing, but it is not possible to have a Git project with multiple folders, one for each project, something that might be common in some cases, like we did with our LibGDX projects.
A bigger problem related to this is that project A should have only the code to be used by other projects, otherwise UPM will import everything.
It also lacks support for transitive dependencies since UPM doesn’t process the dependencies declaration of the Git project.
UPDATE: this is a great tutorial on using git as package provider.
Mixing both approaches with Git submodules
There is also a mix using filesystem reference and Git submodules to overcome the versioning disadvantage of the first approach.
For example, project A is downloaded as project B submodule structure pointing to specific branch/tag/commit.
/ProjectB_Root
   /ProjectB
      /Packages/manifest.json
   /ProjectA (Git submodule, specific tag)
In this way, we have specific versions of project A in each project, and we can share code by uploading it to Git to that submodule and tagging versions. We still have the transitive dependency limitation, and other problems related to Git submodules (more on that later).
Using a packages repository
The last way is to use a local or remote package repository like Nexus, Artifactory, NPM, Verdaccio, etc, and then configure it in the manifest.json:
{
  "registry": "https://unitypackages.gemserk.com",
  "dependencies": {
    "com.gemserk.projectA": "0.0.1"
  }
}
This approach is similar to using Unity’s packages but a remote repository in a private server is needed to share code among developers. It is also possible to upload the code to a public server like NPM. Obviously, a private server need maintenance but I believe it is the long term solution if you have private code you can’t share with the world.
At Gemserk we had our own repository using Nexus and at some point we even uploaded some of our dependencies to Maven central. We configured it when we started making games and probably touched once or twice per year, maintenance wasn’t a problem at all.
I tried to use version range with UPM to see if I can add a dependency to a package 1.0.x and that would automatically download latest 1.0 (for example, 1.0.26) but couldn’t make it work, not sure if it is not supported yet or I am doing it wrong. UPDATE: it is not supported yet but it is going to be in the long term plan.
With this approach, project A is integrated like any Unity’s package and the code is accessible in the VS solution but it can’t be easily modified through project B. Any changes in project A should be made apart, a new version must be uploaded to the repository and then update project B dependency declaration. In some cases this shouldn’t be an issue but, for some development cycles, it could.
Note: When we used Maven, there was a concept of SNAPSHOT which is a work in progress version that it is overwritten each time it is uploaded to the dependency system and projects depending on it use latest version automatically. That was super useful for development and the reason I tested version ranges with UPM.
UPDATE: I tested creating a packages server using Verdaccio and see how UPM interacts with it, and how hard it was to upload a package to the server. It turns out that it is relatively simple, UPM shows the list of available versions and probably get transitive dependencies (didn’t test that yet). I followed this tutorial in case you want to test it too.
After that initial research and considering some of the current limitations of the UPM, I started looking for other options as well.
Using Git Submodules without UPM
In this approach, code is imported using a Git submodule in the project B itself.
/ProjectB
   /Assets
      /ProjectA (submodule)
Following this approach the code is more integrated, changes can be made and uploaded to that submodule directly from project B. In case there are different versions, project B can depend on specific branch/tag/commit of that submodule too.
Similar to the Git + UPM approach, the submodule should contain only the stuff needed to be reused, otherwise it will import it too since submodules point to the root folder of the Git project. However, since it is integrated in the other projects, it should be easier to edit in some way.
It is an interesting approach but has some drawbacks as well, for example, having to update each Git submodule manually by each developer, or the root folder problem.
Reusing code by hand
There is an ultimate form of reusing code: copy and paste the code from project to project. Even though it is ugly and doesn’t scale at all, it might work when having to do some quick tests. Worst case scenario, create a script to automatically copy from one project o another, maybe using rsync or something like that.
Conclusion
Whatever the chosen way of sharing code, first it must be decoupled in a nice way and that’s what I’m planning to write about in the next blog post.
That was my research for now, there are a lot of links to keep digging in the UPM solution. I hope they keep improving it to support transitive dependencies for filesystem and git approaches and version ranges.
References
Implementing Fog of War for RTS games in Unity 2/2
As I said in the previous blog post, some time ago I started working on a new Fog of War / Vision System solution aiming the following features:
- Being able to render the fog of war of each player at any time, for replays and debug.
- Being able to combine multiple players’ visions for alliances, spectator mode or watching replays.
- Blocking vision by different terrain heights or other elements like bushes.
- Optimized to support 50+ units at the same time in mobile devices at 60FPS.
- It should look similar to modern games like Starcraft 2 and League of Legends (in fact, SC2 is already eight years old, not sure if that is consider a modern game or not :P).
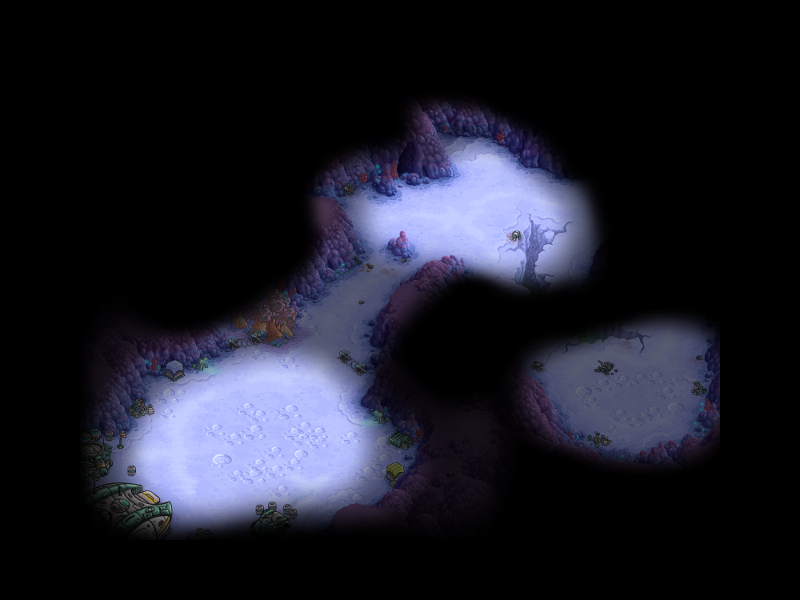
This is an example of what I want:
Example: fog of war in Starcraft 2
To simplify a bit writing this article, when I write unit I mean not only units but also structures or anything that could affect the fog of war in the game.
Logic
First, there is a concept named UnitVision used to represent anything that reveals fog. Here is the data structure:
struct UnitVision
{
   // A bit mask representing a group of players inside
   // the vision system.
   int players;

   // The range of the vision (in world coordinates)
   float range;

   // the position (in world coordinates)
   vector2 position;

   // used for blocking vision
   short terrainHeight;
}
Normally, a game will have one for each unit but there could be cases where a unit could have more (for example a large unit) or even none.
A bit mask is used to specify a group of players, so for example, if player 0 is 0001 and player1 is 0010, then 0011 means the group formed by player0 and player1. Since it is an int, it supports up to sizeof(int) players.
Most of the time the group would contain only one player but there might be some situations, like a general effect or cinematic, etc, that needs to be seen by all players and one possible solution is to use a unitVision with more than one player.
The terrainHeight field stores the current height of the unit and it is used for blocking vision or not. It normally will be the world terrain’s height on that position if it is a ground unit but there are cases like flying units or special abilities that could change the unit height that should be consider when calculating blocked vision. It is the game’s responsibility to update that field accordingly.
There is another concept named VisionGrid that represents the vision for all the players. Here is the data structure:
struct VisionGrid
{
    // the width and height of the grid (needed to access the arrays)
    int width, height;

    // array of size width * height, each entry has an int with the
    // bits representing which players have this entry in vision.
    int[] values;

    // similar to the values but it just stores if a player visited
    // that entry at some point in time.
    int[] visited;

    void SetVisible(i, j, players) {
        values[i + j * width] |= players;
        visited[i + j * width] |= players;
    }

    void Clear() {
        values.clear(0);
    }

    bool IsVisible(i, j, players) {
        return (values[i + j * width] & players) > 0;
    }

    bool WasVisible(i, j, players) {
        return (visited[i + j * width] & players) > 0;
    }
}
Note: arrays have a size of width * height.
The bigger the grid is, the slower it gets to calculate vision but it also has more information which could be useful for units’ behaviors or to get better fog rendering.The smaller the grid is, the opposite. A good balance must be defined from the beginning in order to build the game over that decision.
Here is an example of a grid over the game world:
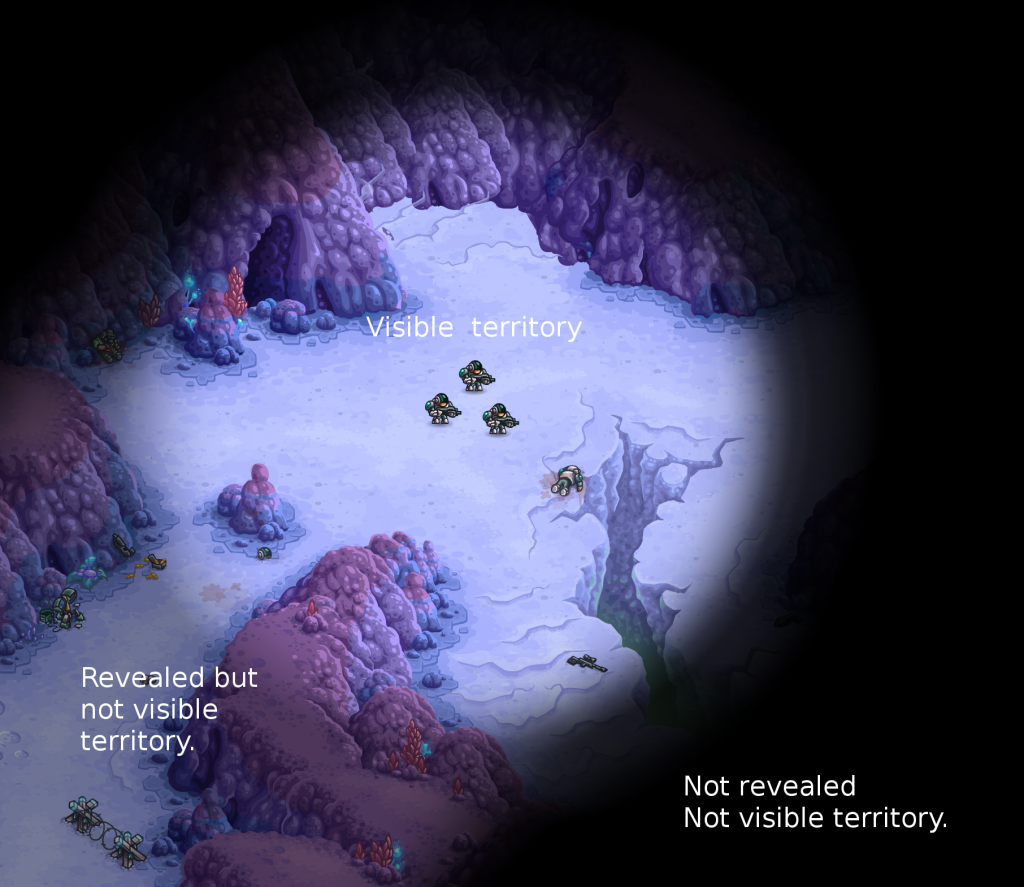
Given a grid entry for a world position, the structure stores an int in the values array with the data of which players have that position inside vision. For example, if the entry has 0001 stored, it means only the player0 sees that point. If it has 0011, then both the player0 and player1.
This structure also stores when a player revealed fog in the past in the visited array which is used mainly for rendering purposes (gray fog) but could also be used by the game logic (to check if a player knows some information for example).
The method IsVisible(i, j, players) will return true if any of the players in the bit mask has the position visible. The method WasVisible(i, j, players) is similar but will check the visited array.
So, for example, if player1 and player2 (0010 and 0100 in bits) are in an alliance, then when player2 wants to know if an enemy is visible to perform an attack, it can call isVisible method with the bitmask for both players 0110.
Calculating vision
Each time the vision grid is updated, the values array is cleared and recalculated.
Here is a pseudo code of the algorithm:
void CalculateVision()
{
   visionGrid.Clear()

   for each unitVision in world {
      for each gridEntry inside unitVision.range {
         if (not IsBlocked(gridEntry)) {
            // where set visible updates both the values and the
            // visited arrays.
            grid.SetVisible(gridEntry.i, gridEntry.j,
                            unitVision.players)
         }
      }
   }
}
To iterate over grid entries inside range, it first calculates vision’s position and range in grid coordinates, named gridPosition and gridRange, and then it draws a filled circle of gridRange radius around gridPosition.
![]()
Blocked vision
In order to detect blocked vision, there is another grid of the same size with terrain’s height information. Here is its data structure:
struct Terrain {
    // the width and height of the grid (needed to access the arrays)
    int width, height;

    // array of size width * height, has the terrain level of the
    // grid entry.
    short[] height;

    int GetHeight(i, j) {
       return height[i + j * width];
    }
}
Here is an example of how the grid looks over the game:

Note: that image is handmade as an example, there might be some mistakes.
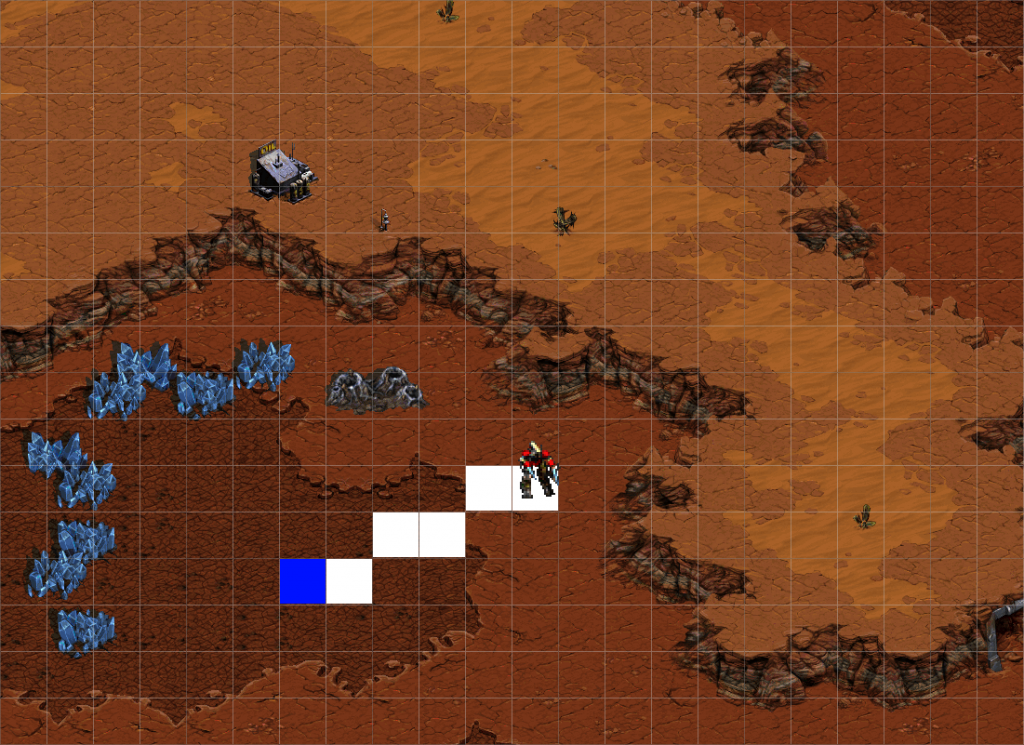
While iterating through the vision’s grid entries around unitVision’s range, to detect if the entry is visible or not, the system checks if there are no obstacles to the vision’s center. To do that, it draws a line from the entry’s position to the center’s position.
If all the grid entries in the line are in the same height or below, then the entry is visible. Here is an example where the blue dot represents the entry being calculated and white dots the line to the center.
If there is at least one entry in the line that is in a greater height, then the line of sight is blocked. Here is an example where the blue dot represents the entry we want to know if it is visible or not, white dots represents entries in the line in the same height and red dots represents entries in a higher ground.
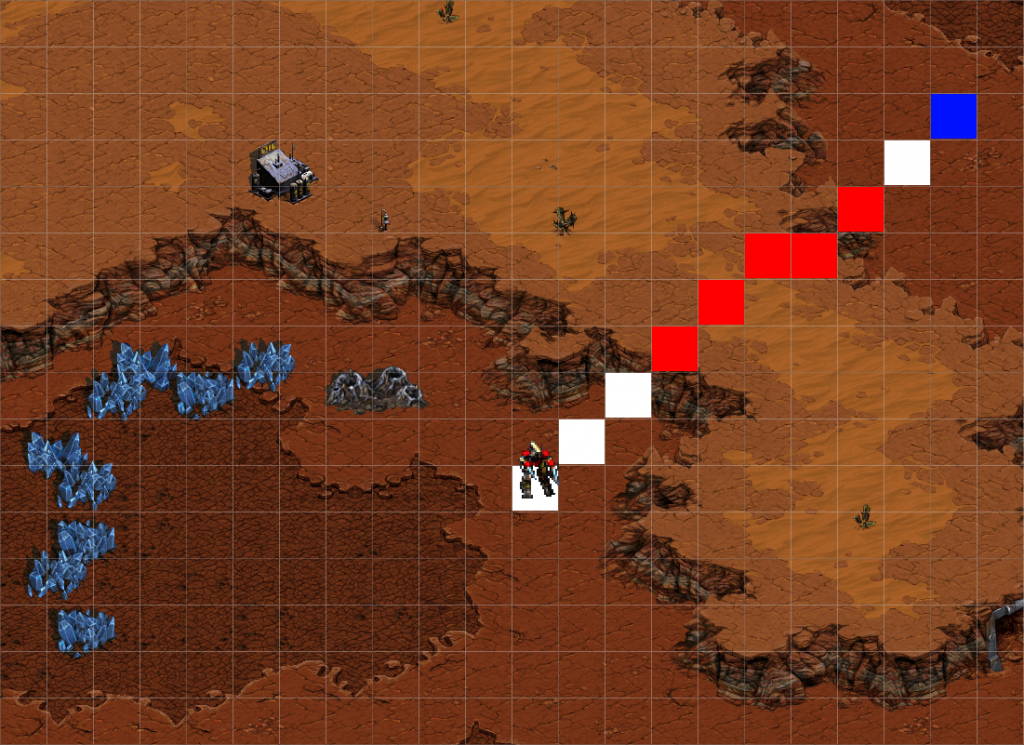
Once it detects one entry above the vision it doesn’t need to continue drawing the line to the vision center.
Here is a pseudo algorithm:
bool IsBlocked()
{
   for each entry in line to unitVision.position {
      height = terrain.GetHeight(entry.position)
      if (height > unitVision.height) {
         return true;
      }
   }
   return false;
}
Optimizations
- If an entry was already marked as visible while iterating over all unit visions then there is no need to recalculate it.
- Reduce the size of the grid.
- Update the fog less frequently (In Starcraft there is a delay of about 1 second, I recently noticed while playing, it is an old game).
Rendering
To render the Fog of War, first I have a small texture of the same size of the grid, named FogTexture, where I write a Color array of the same size using the Texture2D.SetPixels() method.
Each frame, I iterate on each VisionGrid entry and set the corresponding Color to the array using the values and visited arrays. Here is a pseudo algorithm:
void Update()
{
   for i, j in grid {
       colors[i + j * width] = black
       if (visionGrid.IsVisible(i, j, activePlayers))
           colors[pixel] = white
       else if (visionGrid.WasVisible(i, j, activePlayers))
           colors[pixel] = grey // this is for previous vision
   }
   texture.SetPixels(colors)
}
The field activePlayers contains a bit mask of players and it is used to render the current fog of those players. It will normally contain just the main player during game but in situations like replay mode, for example, it can change at any time to render different player’s vision.
In the case that two players are in an alliance, a bitmask for both players can be used to render their shared vision.
After filling the FogTexture, it is rendered in a RenderTexture using a Camera with a Post Processing filter used to apply some blur to make it look better. This RenderTexture is four times bigger in order to get a better result when applying the Post Processing effects.

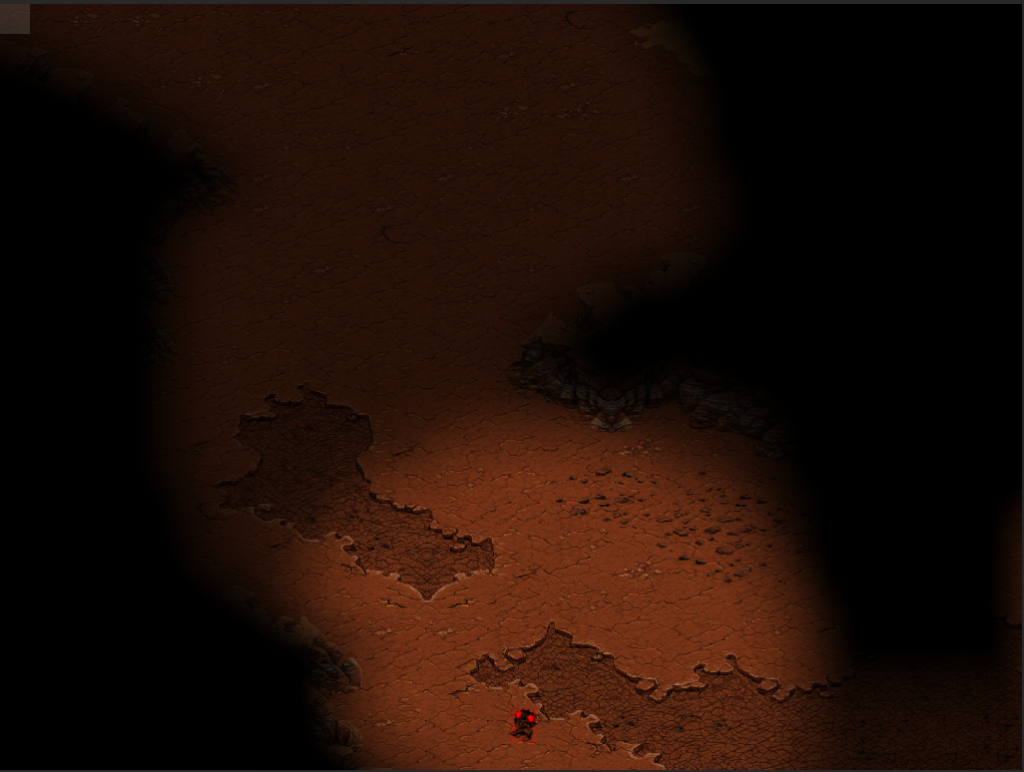
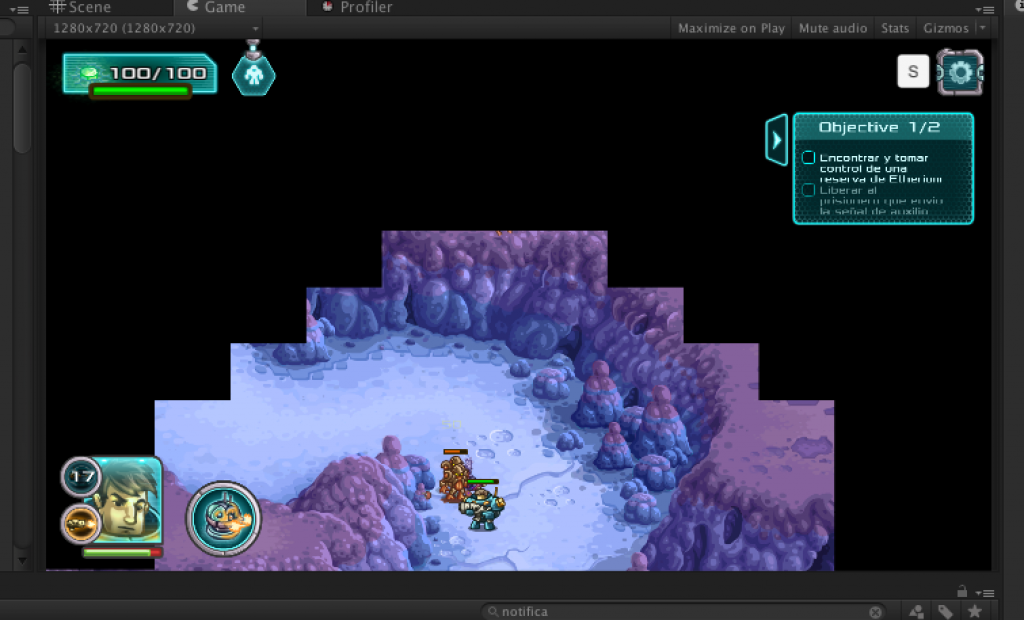
Once I have the RenderTexture, I render it over the game with a custom shader that treats the image as an alpha mask (white is transparent and black is opaque, or red in this case since I don’t need other color channels) similar to how we did with Iron Marines.
Here is how it looks like:
And here is how it looks in the Unity’s Scene View:

The render process is something like this:

Easing
There are some cases when the fog texture changed dramatically from one frame to the other, for example when a new unit appears or when a unit moves to a higher ground.
For those cases, I added easing on the colors array, so each entry in the array transitions in time from the previous state to the new one in order to minimize the change. It was really simple, it added a bit of performance cost when processing the texture pixels but in the end it was so much better than I preferred to pay that extra cost (it can be disabled at any time).
At first I wasn’t sure about writing pixels directly to a texture since I thought it would be slow but, after testing on mobile devices, it is quite fast so it shouldn’t be an issue.
Unit visibility
To know if a unit is visible or not, the system checks for all the entries where the unit is contained (big units could occupy multiple entries) and if at least one of them is visible then the unit is visible. This check is useful to know if a unit can be attacked for example.
Here is a pseudo code:
bool IsVisible(players, unit)
{
  // it is a unit from one of the players
  if ((unit.players & players) > 0)
    return true;

  // returns all the entries where the unit is contained
  entries = visionGrid.GetEntries(unit.position, unit.size)

  for (entry in entries) {
    if (visionGrid.IsVisible(entry, players))
      return true;
  }

  return false;
}
Which units are visible is related with the fog being rendered so we use the same activePlayers field to check whether to show or hide a unit.
To avoid rendering units I followed a similar approach to what we did for Iron Marines using the GameObject’s layer, so if the unit is visible, the default layer is set to its GameObject and if the unit is not visible, a layer that is culled from the game camera is set.
void UpdateVisibles() {
  for (unit in units) {
    unit.gameObject.layer = IsVisible(activePlayers, unit) : default ? hidden;
  }
}
Finally
This is how everything looks working together:
Conclusion
When simplifying the world in a grid and started thinking in terms of textures, it was easier to apply different kind of image algorithms like drawing a filled circle or a line which were really useful when optimizing. There are even more image operations that could be used for the game logic and rendering.
SC2 has a lot of information in terms of textures, not only the player’s vision, and they provide an API to access it and it is being used for machine learning experiments.
I am still working on more features and I plan to try some optimization experiments like using c# job system. I am really excited about that one but I first have to transform my code to make it work. I would love to write about that experiment.
Using a blur effect for the fog texture has some drawbacks like revealing a bit of higher ground when it shouldn’t. I want to research a bit of some other image effect to apply where black color is not modified when blurring but not sure if that is possible or if it is the proper solution. One thing that I want to try though is an upscale technique like the one used in League of Legends when creating the fog texture and then reduce the applied blur effect, all of this to try to minimize the issue.
After writing this blog post and having to create some images to explain concepts I believe it could be great to add more debug features like showing the vision or terrain grid itself at any time or showing a line from one point to another to show where the vision is blocked and why, among other stuff. That could be useful at some point.
This blog post was really hard to write since, even though I am familiarized with the logic, it was hard to define the proper concepts to be clear when explaining it. In the end, I feel like I forgot to explain some stuff but I can’t realize exactly what.
As always, I really hope you enjoyed it and it would be great to hear your feedback to improve writing this kind of blog posts.
Thanks for reading!
Implementing Fog of War for RTS games in Unity 1/2
For the last 3 years, I’ve been working on Iron Marines at Ironhide Game Studio, a Real time Strategy Game for mobile devices. During its development, we created a Fog of War solution that works pretty well for the game but it lacks some of the common features other RTS games have, and how to improve that is something I wanted to learn at some point in my life.
Recently, after reading a Riot Games Engineering blog post about Fog of War in League of Legends, I got motivated and started prototyping a new implementation.
In this blog post I will explain Iron Marines’ Fog of War solution in detail and then I will write another blog post about the new solution and explain why I consider it is better than the first one.
Fog of War in Strategy Games
It normally represents the missing information about the battle, for example, not knowing how the terrain is yet, or outdated information, for example, the old position of an enemy base. Player units and buildings provide vision that removes Fog during the game revealing information about the terrain and the current location and state of the enemies.
Example: Dune 2 and its Fog of War representing the unknown territory (by the way, you can play Dune 2 online).
Example: Warcraft: Orcs and Humans' Fog of War (it seems you can play Warcraft online too).
The concept of Fog of War is being used in strategy games since more than 20 years now, which is a lot for video games.
Process
We started by researching other games and deciding what we wanted before start implementing anything.
After that, we decided to target a similar solution to Starcraft (by the way, it is free to play now, just download Battle.net and create an account). In that game, units and buildings have a range of vision that provide vision to the Player. Unexplored territory is covered with full opacity black fog while previously explored territory is covered by half opacity fog, revealing what the Player know about it, information that doesn’t change during the game.
Enemy units and buildings are visible only if they are inside Player’s vision but buildings leave over a last known location after they are not visible anymore. I believe the main reason for that they can’t normally move (with the exception of some Terran buildings) so it is logical to assume they will stay in that position after losing vision and might be vital information about the battle.
Iron Marines
Given those rules, we created mock images to see how we wanted it to look in our game before started implementing anything.
Mock Image 1: Testing terrain with different kind of Fog in one of the stages of Iron Marines.

Mock Image 2: Testing now with enemy units to see when they should be visible or not.
We started by prototyping the logic to see if it works for our game or not and how we should adapt it.
For that, we used an int matrix representing a discrete version of the game world where the Player’s vision is. A matrix’s entry with value 0 means the Player has no vision at that position and a value of 1 or greater means it has.

Image: in this matrix there are 3 visions, and one has greater range.
Units and buildings’ visions will increment 1 to the value of all entries that represent world positions inside their vision range. Each time they move, we first decrease 1 from its previous position and then we increment 1 in the new position.
We have a matrix for each Player that is used for showing or hiding enemy units and buildings and for auto targeting abilities that can’t fire outside Player’s vision.
To determine if an enemy unit or building is visible or not, we first get the corresponding entry of the matrix by transforming its world position and check if the stored value is greater than 0 or not. If not, we change its GameObject layer to one that is culled from the main camera to avoid rendering it, we named that layer “hidden”. If it is visible, we change it back to the default layer, so it starts being rendered again.

Image: shows how enemy units are not rendered in the Game view. I explain later why buildings are rendered even outside the Player’s vision.
Visuals
We started by just rendering a black or grey color quad over the game world for each matrix’s entry, here is an image showing how it looks like (it is the only one I found in the chest of memories):
This allowed us to prototype and decide some features we didn’t want. In particular, we avoided blocking vision by obstacles like mountains or trees since we preferred to avoid the feeling of confinement and also we don’t have multiple levels of terrain like other games do. I will talk more about that feature in the next blog post.
After we knew what we wanted, and tested in the game for a while, we decided to start improving the visual solution.
The improved version consists in rendering a texture with the Fog of War over the entire game world, similar to what we did when we created the visual mocks.
For that, we created a GameObject with a MeshRenderer and scaled it to cover the game world. That mesh renders a texture named FogTexture, which contains the Fog information, using a Shader that considers pixels’ colors as an inverted alpha channel, from White color as full transparent to Black color as full opaque.
Now, in order to fill the FogTexture, we created a separated Camera, named FogCamera, that renders to the texture using a RenderTexture. For each object that provides vision in the game world, we created a corresponding GameObject inside the FogCamera by transforming its position accordingly and scaling it based on the vision’s range. We use a separated Unity’s Layer that is culled from other cameras to only render those GameObjects in the FogCamera.
To complete the process, each of those objects have a SpriteRenderer with a small white Ellipse texture to render white pixels inside the RenderTexture.
Note: we use an Ellipse instead of a Circle to simulate the game perspective.

Image: This is the texture used for each vision, it is a white Ellipse with transparency (I had to make the transparency opaque so the reader can see it).
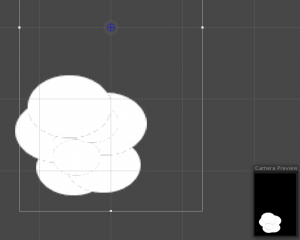
Image: this is an example of the GameObjects and the FogCamera.
In order to make the FogTexture look smooth over the game, we applied a small blur to the FogCamera when rendering to the RenderTexture. We tested different blur shaders and different configurations until we found one that worked fine on multiple mobile devices. Here is how it looks like:
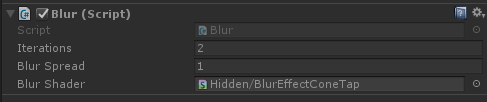
And here is how the Fog looks like in the game, without and with blur: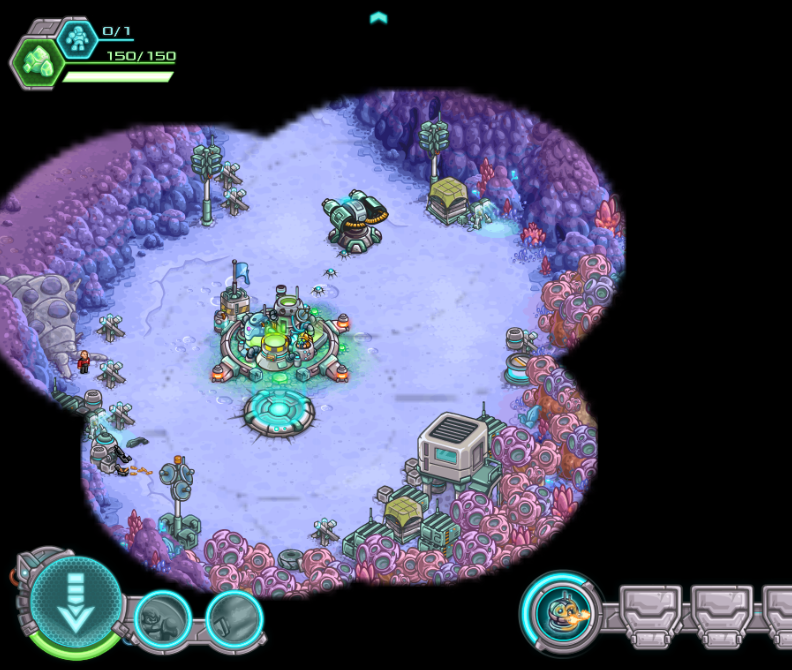

For the purpose of rendering previously revealed territory, we had to add a previous step to the process. In this step, we configured another camera, named PreviousFogCamera, using a RenderTexture too, named PreviousVisionTexture, and we first render the visions there (using the same procedure). The main difference is that the camera is configured to not clear the buffer by using the “Don’t Clear” clear flag, so we can keep the data from previous frames.
After that, we render both the PreviousVisionTexture in gray color and the vision’s GameObjects in the FogTexture using the FogCamera. The final result looks like this:
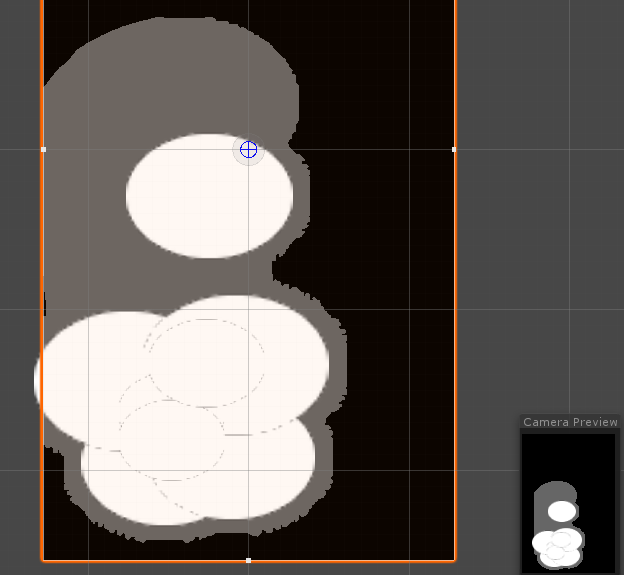
Image: it shows the revealed territory in the FogCamera.
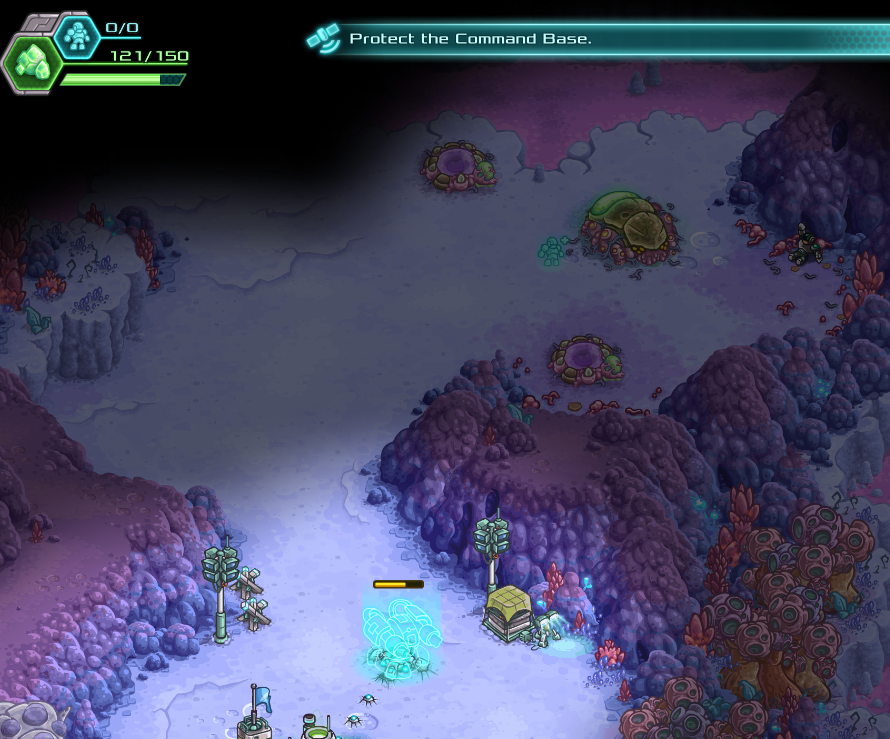
Image: and here is an example of how the Fog with previous revealed territory looks in the game.
Buildings
Since buildings in Iron Marines are big and they don’t move like Starcraft, we wanted to follow a similar solution.
In order to do that, we identified buildings we wanted to show below the Fog by adding a Component and configuring they were going to be rendered when not inside the Player’s vision.
Then, there is a System that, when a GameObject with that Component enters the Player’s vision for the first time, it creates another GameObject and configures it accordingly. That GameObject is automatically turned on when the building is not inside the Player’s vision anymore and turned off when the building is inside vision. If, by some reason the building was destroyed while not in inside vision, the GameObject doesn’t disappear until the Player discovers its new state.
We added a small easing when entering and leaving the Player’s vision to make it look a bit smoother. Here is a video showing how it looks like:
Conclusion
Our solution lacks some of the common Fog of War features but it works perfectly for our game and looks really nice. It also performed pretty well on mobile devices, which is our main target, and if not done properly it could have affected the game negatively. We are really proud and happy with what we achieved developing Iron Marines.
That was, in great part, how we implemented Fog of War for Iron Marines. I hope you liked both the solution and the article. In the next blog post I will talk more about the new solution which includes more features.
Thanks for reading!
How we used Entity Component System (ECS) approach at Gemserk - 2/2
So, after our first attempt on using ECS, when we started to develop mobile games and moved to the LibGDX framework, we decided to abandon our ComponentsEngine and start over.
We were still reading about ECS while we were creating our set of tools and code over LibGDX. At some point in time, some of the Java community developers started Artemis, a lightweight ECS, and we decided to give it a try.
Artemis
This is a simplified core architecture diagram:
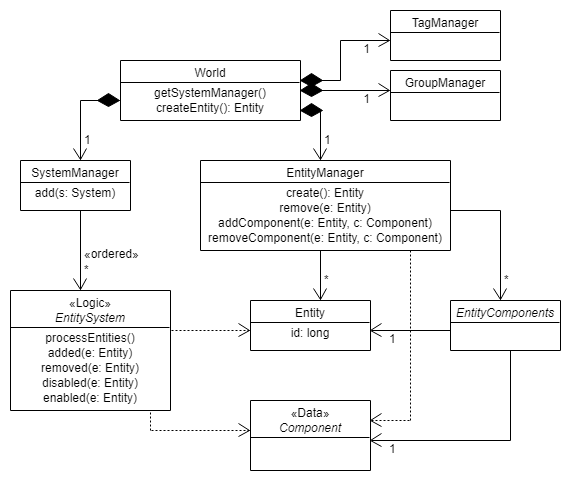
Note: we used a modified version of Artemis with some additions like enable/disable an Entity.
In this pure approach, Entities and Components are just data, and they are related by identifiers, like these tables in a relational database:
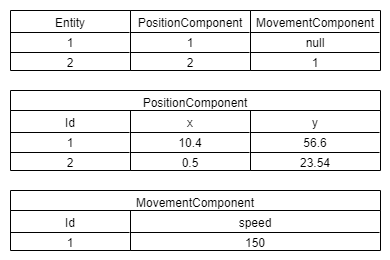
Where we have two entities, both with a PositionComponent and only one of them with MovementComponent.
An example of this components in code:
public class PositionComponent : Component {
    public float x, y;
}

public class MovementComponent: Component {
    public float speed;
}
EntitySystems perform the game logic. They normally work on a subset of Components from an Entity but they could need it in order to enable/disable/destroy it (if it is part of its logic).
An example of a System is LimitLinearVelocitySystem, used in multiple of our games to limit the physics velocity of an Entity with PhysicsComponent and LimitVelocityLimitComponent:
public void process(Entity e) {
    PhysicsComponent physicsComponent =
                     Components.getPhysicsComponent(e);
    Body body = physicsComponent.getPhysics().getBody();

    LinearVelocityLimitComponent limitComponent =
             e.getComponent(LinearVelocityLimitComponent.class);
    Vector2 linearVelocity = body.getLinearVelocity();

    float speed = linearVelocity.len();
    float maxSpeed = limitComponent.getLimit();

    if (speed > maxSpeed) {
        float factor = maxSpeed / speed;
        linearVelocity.mul(factor);
        body.setLinearVelocity(linearVelocity);
    }
}
There are some extra classes like the TagManager which allows assigning a unique string identifier to an Entity in order to find it, and the GroupManager which allows adding entities to groups identified by a name, which is more like how tags are used everywhere else.
Even though it could look similar to our ComponentsEngine where the Properties in that engine correspond to the Components in this one, and Components to Systems, there is an important difference: Systems are not part of an Entity and work horizontally over all entities with specific Components (data). So, in this approach, changing only data from entities indeed change their behaviour in the game, so it is really data driven.
Since Entities and Components are just data, their instances in memory are easier to reuse. An Entity is just an id, so it is obvious. A Component is a set of data that doesn’t care too much which Entity it belongs to. So, after the Entity doesn’t need it anymore, it could be reused elsewhere, improving a lot memory usage and garbage collection.
Artemis, and other pure ECS implementations, are really lightweight and performant frameworks. The real power comes from the Systems and Components built over them. In our case, we created a lot of Systems that we started to reuse between games, from SuperFlyingThing to VampireRunner and even in Clash of the Olympians.
Scripting
One of the most interesting ones is the Scripting framework we created over Artemis. It was really useful and gave us a lot of power to overcome some of the limitations we were facing with the pure approach when we need to create a specific logic for a specific moment during the game and (probably) never again and we didn’t want a System for that.
They work similar to Unity MonoBehaviours and our logic Components from ComponentsEngine, and they also belong to the Entity lifecycle. One difference, however, is that they try to avoid storing data in their instances as much as possible and instead try to store and read data from Components, like Systems do.
Here is an example Script from one of our games:
public class MovementScript extends ScriptJavaImpl {

  @Override
  public void update(World world, Entity e) {

    MovementComponent movementComponent = Components.getMovementComponent(e);
    SpatialComponent spatialComponent = Components.getSpatialComponent(e);
    ControllerComponent controllerComponent = Components.getControllerComponent(e);

    Controller controller = controllerComponent.controller;
    Movement movement = movementComponent.getMovement();
    Spatial spatial = spatialComponent.getSpatial();

    float rotationAngle = controllerComponent.rotationSpeed * GlobalTime.getDelta();

    Vector2 linearVelocity = movement.getLinearVelocity();

    if (controller.left) {
        spatial.setAngle(spatial.getAngle() + rotationAngle);
        linearVelocity.rotate(rotationAngle);
    } else if (controller.right) {
        spatial.setAngle(spatial.getAngle() - rotationAngle);
        linearVelocity.rotate(-rotationAngle);
    }

  }

}
Note: GlobalTime.getDelta() is similar to Unity’s Time API.
One problem about the Scripting framework is that it is not always clear when some logic should be in a Script or a System, and that made reusability a bit harder. In the case of the example above, it is obvious it should be moved to a System.
Templates
Another useful thing we did over Artemis was using templates to build entities in a specific way, similar to what we had in ComponentsEngine.
We used also a concept of Parameters in templates in order to customize parts of them. Similar to ComponentsEngine, templates could apply other templates and different templates could be applied to the same Entity.
Here is an example of an Entity template:
public void apply(Entity entity) {

    String id = parameters.get("id");
    String targetPortalId = parameters.get("targetPortalId");
    String spriteId = parameters.get("sprite", "PortalSprite");
    Spatial spatial = parameters.get("spatial");
    Script script = parameters.get("script", new PortalScript());

    Sprite sprite = resourceManager.getResourceValue(spriteId);

    entity.addComponent(new TagComponent(id));
    entity.addComponent(new SpriteComponent(sprite, Colors.darkBlue));
    entity.addComponent(new Components.PortalComponent(targetPortalId, spatial.getAngle()));
    entity.addComponent(new RenderableComponent(-5));
    entity.addComponent(new SpatialComponent(spatial));
    entity.addComponent(new ScriptComponent(script));

    Body body = bodyBuilder //
            .fixture(bodyBuilder.fixtureDefBuilder() //
                    .circleShape(spatial.getWidth() * 0.35f) //
                    .categoryBits(CategoryBits.ObstacleCategoryBits) //
                    .maskBits((short) (CategoryBits.AllCategoryBits & ~CategoryBits.ObstacleCategoryBits)) //
                    .sensor()) //
            .position(spatial.getX(), spatial.getY()) //
            .mass(1f) //
            .type(BodyType.StaticBody) //
            .userData(entity) //
            .build();

    entity.addComponent(new PhysicsComponent(new PhysicsImpl(body)));
}
That template configures a Portal entity in SuperFlyingThing which teleports the main ship from one place to another. Click here for the list of templates used in that game.
Interacting with other systems
Sometimes you already have a solution for something, like the physics engine, and you want to integrate it with the ECS. The way we found was to create a way to synchronize data from that system to the ECS and vice versa, sometimes having to replicate a bit of data in order to have it easier for the game to use it.
Finally
Even though we had to do some modifications and we know it could still be improved, we loved using a pure ECS in the way we did.
It was used to build different kind of games/prototypes and even a full game like the Clash of the Olympians for mobile devices, and it worked pretty well.
What about now?
Right now we are not using any of this in Unity. However we never lost interest nor feith in ECS, and there are starting to appear new solutions over Unity in the last years that caught our attention. Entitas is one of them. The Unity team is working towards this path too as shown in this video. Someone who din’t want to wait started implementing that solution in his own way. We’ve also watched some Unite and GDC talks about using this approach in big games and some of them even have a Scripting layer too, which is awesome since, in some way, it validates we weren’t so wrong ;).
I am exited to try ECS approach again in the near future. I believe it could be a really good foundation for multiplayer games and that is something I’m really interested in doing at some point in my life.
Thanks for reading.
References
- A mini tutorial on how to use Artemis.
- The source code of Artemis + our modifications.
- A blog post on the enable/disable addition over Artemis.
- A blog post explaining our Scripting framework over Artemis.
- How we managed to use external data like box2d physics inside the Artemis.
- All our code over artemis, like the Systems used in different games.
- Example components used in SuperFlyingThing game.
- Example systems we reused among different games.
- The first of a serie of great articles about ECS.
- A website explaining Artemis.
How we used Entity Component System (ECS) approach at Gemserk - 1/2
When we started Gemserk eight years ago, we didn’t know which was the best way to make games. So before starting, we did some research. After reading some articles and presentations we were really interested in trying an Entity Component System (ECS) approach for our games. However, since we didn’t find a clear guide or implementation at that point we had to create our own solution while exploring and understanding it. We named our engine ComponentsEngine.
Components Engine
The following image shows a simplified core architecture diagram:

Note: part of the design was inspired by a Flash ECS engine named PushButtonEngine.
An Entity is just a holder of state and logic. In an ECS, anything can be an Entity, from an enemy ship to the concept of a player or even a file path to a level definition. It depends a lot on the game you are making and how you want to structure it.
A Property is part of the state of an Entity, like the health or the position in the world, anything that means something for the state of the game. It can be accessed and modified from outside.
Components perform logic updating one or more Properties to change the Entity state. A component could for example change the position of an Entity given a speed and a moving direction.
They normally communicate with each other either by modifying common Properties (when on the same Entity) or by sending and receiving Messages through a MessageDispatcher (when on the same or on different Entities). They just have to register a method to handle a message. In some way, this is pretty similar to using SendMessage() method in Unity and having the proper methods in the MonoBehaviours that need to react to those messages.
EntityTemplates are an easy way to define and build specific game entities, they just add Properties and Components (and more stuff) to make an Entity behave in one way or another.
For example, a ShipTemplate could add position, velocity and health properties and some components to perform movement and to process damage from bullet hits:
public void build() {
        // ... more stuff
        property("position", new Vector2f(0, 0));
        property("direction", new Vector2f(1, 0));

        property("speed", 5.0f);

        property("currentHealth", 100.0f);
        property("maxHealth", 100.0f);

        component(new MovementComponent());
        component(new HealthComponent());
}
An example of the MovementComponent:
public class MovementComponent() {

   @EntityProperty
   Vector2f position;

   @EntityProperty
   Vector2f direction;

   @EntityProperty
   Float speed;

   @Handles
   public void update(Message message) {
      Property<Float> dt = message.getProperty("deltaTime");
      position += direction * speed * dt.get();
   }

}
EntityTemplates are similar to Unity Prefabs or Unreal Engine Blueprints, representing in some way a (not pure) Prototype pattern.
Some interesting stuff of our engine:
- We can apply multiple templates to the same Entity. In this way, we could add generic features, like motion for example, by applying common templates. So, we could do something like OrcTemplate.apply(e) to add the orc properties and components and then MovableTemplate.apply(e), so now we have an Orc that moves.
- Templates can apply other templates inside them. So we could do the same as before but inside OrcTemplate, we could apply MovableTemplate there. Or even use this to create specific templates, like OrcBossTemplate which is an Orc with a special ability.
- Entities have also tags which are defined when applying a template too and are used to quickly identify entities of interest. For example, if we want to identify all bullets in the game, we could add the tag “Bullet” during the Entity creation and then, when processing a special power, we get all the bullets in the scene and make them explode. Note: in some ECS a “flag” component is used for this purpose.
- The Property abstraction is really powerful, it can be implemented in any way, for example, an expression property like “my current health is my speed * 2”. We used that while prototyping.
Some bad stuff:
- Execution speed wasn’t good, we had a lot of layers in the middle, a lot of reflection, send and receive messages (even for the update method), a lot of boxing and unboxing, etc. It worked ok in desktop but wasn’t a viable solution for mobile devices.
- The logic started to be distributed all around and it wasn’t easy to reuse, and we started to have tons of special cases, when we couldn’t reuse something we simply copy-pasted and changed it.
- There was a lot of code in the Components to get/set properties instead of just doing the important logic.
- Indirection in Properties code was powerful but we end up with stuff like this (and we didn’t like it since it was too much code overhead):
e.getProperty("key").value = e.getProperty("key").value + 1.
- We didn’t manage to have a good data driven approach which is one of the best points of ECS. In order to have different behaviours we were forced to add both properties, components and even tags instead of just changing data.
Note: Some of these points can be improved but we never worked on that.
Even though we don’t think the achitecture is bad, it guided us to do stuff in a way we didn’t like it and didn’t scale. We feel that Unity does the same thing with its GameObjects and MonoBehaviours, all the examples in their documentation go in that direction.
That was our first try to the ECS approach. In case you are interested, ComponentsEngine and all the games we did with it are on Github and even though they are probably not compiling, they could be used as reference.
This post will continue with how we later transitioned to use a more pure approach with Artemis, when we were more dedicated to mobile games.
References
Evolve your hierarchy - Classic article about Entity Component System.
PushButtonEngine - Flash Entity Component System we used as reference when developing our ComponentsEngine.
Game architecture is different - A quick transformation from normal game architecture to ECS.
Slick2D - The game library we were using during ComponentsEngine development.