Assigning interface dependencies to MonoBehaviour fields in Unity Editor
In Unity, Object’s public fields of type interface are not serialized, so that means it is not possible to configure them using the editor like you do with other stuff like dependencies to MonoBehaviours.
One possible way to deflect this problem is to create an abstract MonoBehaviour and depend on that instead:
public abstract class ServiceBase : MonoBehaviour
{
  public abstract void DoStuff();
}

public class ServiceUser : MonoBehaviour
{
  public ServiceBase service;

  void Update()
  {
    service.DoStuff ();
  }
}
This solution has some limitations. One of them is you can’t create a sub class of multiple base classes like you do when implementing interfaces. Another limitation is that you can’t easily switch between a MonoBehaviour implementation to a ScriptableObject implementation (or any other).
Working on Iron Marines and Dashy Ninja, I normally end up referencing a UnityEngine.Object and then in runtime I try to get the specific interface, like this:
public interface IService
{
  void DoStuff();
}

public class CharacterExample : MonoBehaviour
{
  public UnityEngine.Object objectWithInterface;
  IService _service;

  void Start ()
  {
    var referenceGameObject = objectWithInterface as GameObject;
    if (referenceGameObject != null) {
      _service = referenceGameObject.GetComponentInChildren<IService> ();
    } else {
      _service = objectWithInterface as IService;
    }
  }

  void Update()
  {
    _service.DoStuff ();
  }
}
Then, in Unity Editor I can assign both GameObjects and ScriptableObjects (or any other Object):
That works pretty well but I end up having the code of how to get the interface duplicated all around.
To avoid that, I made up two helper classes with the code to retrieve the interface from the proper location. These are InterfaceReference and InterfaceObject
InterfaceReference
[Serializable]
public class InterfaceReference
{
  public UnityEngine.Object _object;
  object _cachedGameObject;

  public T Get<T>() where T : class
  {
    if (_object == null)
      return _cachedGameObject as T;

    var go = _object as GameObject;

    if (go != null) {
      _cachedGameObject = go.GetComponentInChildren<T> ();
    } else {
      _cachedGameObject = _object;
    }

    return _cachedGameObject as T;
  }

  public void Set<T>(T t) where T : class
  {
    _cachedGameObject = t;
    _object = t as UnityEngine.Object;
  }
}
Usage example:
 public class CharacterExample : MonoBehaviour
 {
     public InterfaceReference service;

     void Update()
     {
         // some logic
         service.Get<IService>().DoStuff();
     }
 }
The advantage of this class is that it could be simply used anywhere and it is already serialized by Unity. But the disadvantage is having to ask for specific interface when calling the Get() method. If that is only in one place, great, but if you have to do it a lot in the code it doesn’t look so good. In that case, it could be better to have another field and assign it once in Awake() or Start() methods.
InterfaceObject
public class InterfaceObject<T> where T : class
 {
     public UnityEngine.Object _object;
     T _instance;

     public T Get() {
         if (_instance == null) {
             var go = _object as GameObject;
             if (go != null) {
                 _instance = go.GetComponentInChildren<T> ();
             } else {
                 _instance = _object as T;
             }
         }
         return _instance;
     }

     public void Set(T t) {
         _instance = t;
         _object = t as UnityEngine.Object;
     }
 }
Note: the Get() and Set() methods could be a C# Property also, which would be useful to allow the debugger to evaluate the property when inspecting it.
Usage example:
 [Serializable]
 public class IServiceObject : InterfaceObject<IService>
 {

 }

 public class CharacterExample : MonoBehaviour
 {
     public IServiceObject service;

     void Update()
     {
         // some logic
         service.Get().DoStuff();
     }
 }
The advantage of this class is that you can use the Get() method without having to cast to the specific interface. The disadvantage, however, is that it is not serializable because it is a generic class. In order to solve that, an empty implementation with a specific type must be created to allow Unity to serialize it, like it is shown in the previous example. If you don’t have a lot of interfaces you want to configure, then I believe this could be a good solution.
All of this is simple but useful code to help configuring stuff in the Unity Editor.
I am working on different experiments on how to improve Unity’s usage for me. Here is a link to the project in case you are interested in taking a look.
Thanks for reading
We are working on a new Game for mobile devices named Dashy Ninja
After the last Ludum Dare#38 we were really excited about what we accomplished and decided to work on something together in our spare time. So, we started working on a new Unity game for mobile devices currently named Dashy Ninja.
This game is about a Cat facing the most difficult and challenging trials to achieve the unachievable and go where no other Cat has gone before to become the ultimate Ninja Cat.
The mechanics of the game are simple, by making quick drag gestures the cute cat dashes through the level attaching itself to platforms on the way. If a trap gets the character, it is “magically teleported back” (no animals were harmed in the making this blog post) and starts over again. The player has to feel as Ninja as possible.
We wanted to make a proper introduction of the game so we can start sharing dev stuff of the most awesome Ninja Cat in the Universe.

Our tips to improve Unity UI performance when making games for mobile devices
There is a Unity Unite talk named “Unite Europe 2017 - Squeezing Unity: Tips for raising performance” by Ian Dundore about things you can do in your game to improve Unity performance by explaining how Unity works behind the scenes.
Update: I just noted (when I was about to complete the post) there is another talk by Ian from Unite 2016 named “Unite 2016 - Let’s Talk (Content) Optimization”, which has other good tips as well.
There are two techniques to improve Unity UI performance we use at work they didn’t mention in the video and we want to share them in this blog post. One of them is using CanvasGroup component and the other one is using RectMask2D.
CanvasGroup
CanvasGroup component controls the alpha value of all the elements inside in its RectTransform hierarchy and whether that hierarchy handle input or not. The first one is mainly used for render purposes while the second one for user interaction.
What is awesome about CanvasGroup is, if you want to avoid rendering a hierarchy of elements, you can just put alpha in 0 and that will avoid sending it to render queue improving gpu usage, or at least that is what the FrameDebugger and our performance tests say. If you also want to avoid that hierarchy to consume events from the EventSystem, you can turn off the block raycast property and that will avoid all the raycast checks for its children, improving cpu usage. The combination of those two is important. It is also easier and more designer friendly than iterating over all the children with CanvasRender and disable them. Same thing to disable/enable all objects handling raycasts.
In our case, at work, we are using multiple Canvas objects and have all of them “disabled” (not being rendered nor handling input) using CanvasGroup alpha and block raycasts properties. That improves a lot the speed of activating and deactivating our metagame screens since it avoids regenerating the mesh and calculating layout again which GameObject SetActive() does.
RectMask2D
The idea when using masks it to hide part of the screen in some way, even using particular shapes. We use masks a lot at work in the metagame screens, mainly to show stuff in a ScrollRect in a nice way.
We started using just Mask component, with an Image without Sprite set, to crop what we wanted. Even though it worked ok, it wasn’t performing well on mobile devices. After investigating a bit with FrameDebugger we discovered we had tons of render calls of stuff that was outside the ScrollRect (and the mask).
Since we are just using rectangle containers for those ScrollRects, we changed to use RectMask2D instead. For ScrollRects with a lot of elements, that change improved enormously the performance since it was like the elements outside the mask weren’t there anymore in terms of render calls.
This was a great change but only works if you are using rectangle containers, doesn’t work with other shapes. Note that the Unity UI Mask tutorial only shows image masks and doesn’t say anything about performance cost at all (it should).
Note: when working with masks there is a common technique of adding something over the mask to hide possible ugly mask borders, we normally do that on all our ScrollRect that doesn’t cover all the screen.
Bonus track: The touch hack
There is another one, a hack, we call it the Touch Hack. It is a way to handle touch all over the screen without render penalty, not sure it is a great tip but it helped us.
The first thing we thought when handling touch all over the screen (to do popup logic and/or block all the other canvases) was to use an Image, without Sprite set, expanded to all the screen with raycast enabled. That worked ok but it was not only breaking the batch but also rendering a big empty transparent quad to all the screen which is really bad on mobile devices.
Our solution was to change to use a Text instead, also expanded to all the screen but without Font nor text set. It doesn’t consume render time (tested on mobile devices) and handles the raycasts as expected, I suppose it is because it doesn’t generate the mesh (since it doesn’t have text nor font set) and at the same time still has the bounding box for raycasts configured.
Conclusion
It is really important to have good tools to detect where the problems are and a way to know if you are improving or not. We use a lot the FrameDebugger (to see what was being drawn, how many render calls, etc), the overdraw Scene view and the Profiler (to see the Unity UI CPU cost).
Hope these tips could help when using Unity UI to improve even more the performance of your games.
More
Optimizing Unity UI - http://www.tantzygames.com/blog/optimizing-unity-ui/
A guide to optimizing Unity UI - https://unity3d.com/es/learn/tutorials/temas/best-practices/guide-optimizing-unity-ui
Implementing Multiple Canvas Groups In Unity 5 - http://www.israel-smith.com/thoughts/implementing-multiple-canvas-groups-in-unity-5/
Pigs Mayhem in Space, our Ludum Dare Jam #38 entry
After some years of Ludum Dare (LD from now on) inactivity, we decided to participate in LD #38 Jam. And when I say we I mean Rubén and I! Of course, since we are great artists, we joined forces with Thony, a young artist who is really really good (just open the link and see it by yourself).
The theme of this LD was “A small world” and our game was Pigs Mayhem in Space:
After iterating over a thousand ideas (yeah, I like to exaggerate, they were only 999) the first day, we ended up with a 3d, turn by turn game where you have to use projectiles and physics to kill the other players (like Worms). This is one of the first concept:
And this is the how the game looked at the end:
Small post mortem
The bad
- It took us a lot of time to define the game, and that means we did a lot of work on stuff we didn’t use.
- We didn’t spend time polishing the controls and when we wanted it was already too late. That affected a lot the game experience.
The good
- We were aligned with the game we wanted to do and with almost every decision.
- The art style was quickly defined and without setbacks. It helped a lot to visualize the final game.
- Working together was really smooth, the game was first and all decisions were to make the game better.
Conclusion
Even though Rubén and I work together at Ironhide, we are not in the same team and even though we share stuff between projects, I missed a lot working directly with him in the same project, since, you know, we fight discuss a lot but the results are always better 🙂
This was my first time working with Thony (Rubén and Thony work in the same team at Ironhide) and it was prety awesome. He has good control on 3d tools and Unity and does great 2d art (the game proves it!).
As always, it was a great experience, it helped on exercising the creative process of developing games and learning how different kind of games are made.
Links
Playing with Starcraft 2 Editor to understand how a good RTS is made
When working on Iron Marines engine at work we did some research on other RTS games in order to have more knowledge on how they did some stuff and why. In this post, in particular, I want to share a bit of my research on the SC2 Editor which helped a lot when making our own editor.
The objective was to see what a Game Designer could do or not with the SC2 Editor in order to understand some decisions about the editor and the engine itself.
Obviously, by taking a look at the game mods/maps available it is clear that you could build entire games over the SC2 engine, but I wanted to see the basics, how to define and control the game logic.
As a side note, I love RTS games since I was a child, I played a lot of Dune 2 and Warcraft 1. I remember playing with the editors of Command & Conquer and Warcraft 2 also, it was really cool, so much power 😉 and fun. With one of my brothers, each one had to make a map and the other had to play and beat it (we did the same with Doom and Duke Nukem 3d editors).
SC2 Editor
SC2 maps are built with Triggers which are composed by Events, Conditions and Actions to define parts of the game logic. There are a lot of other elements as well that I will talk a bit after explaining the basics.
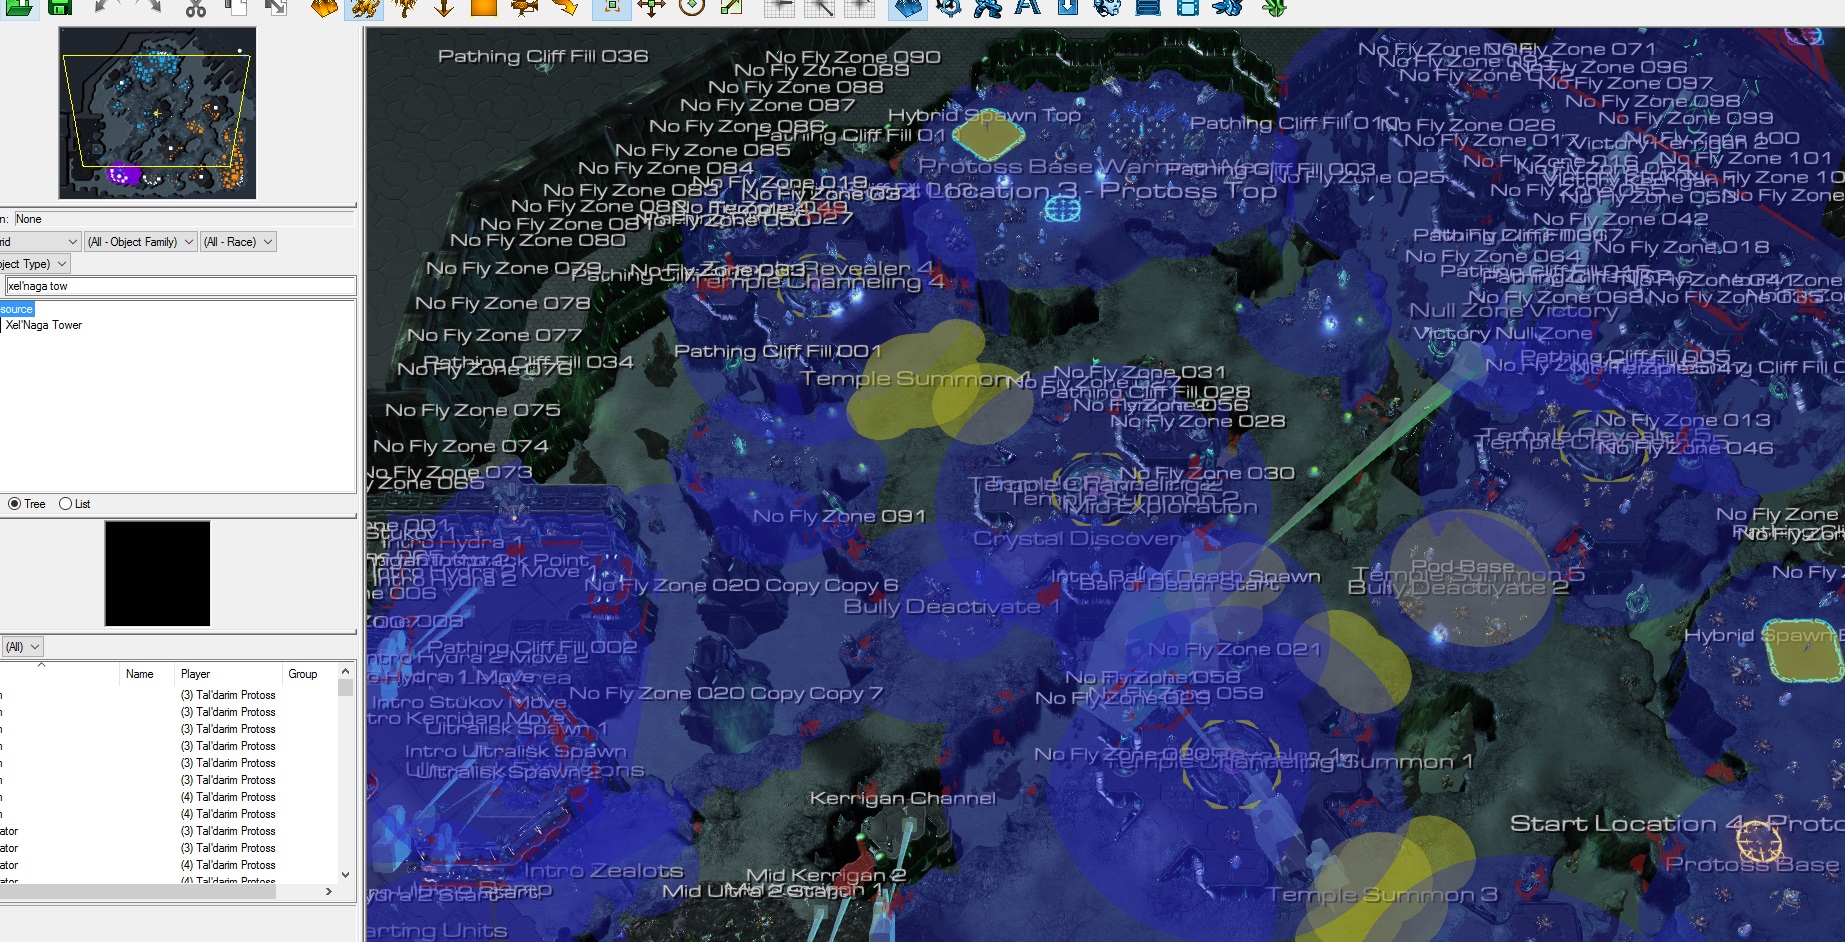
Here is an image of the SC2 Editor with an advanced map:
Trigger logic
The Triggers are where the general map logic is defined. They are triggered by Events and say which Actions should be performed if given Conditions are met. Even though behind the scenes the logic is C/C++ code and it is calling functions with similar names, the Editor shows it in a natural language like “Is Any Unit of Player1 Alive?” which helps for quick reading and understanding.
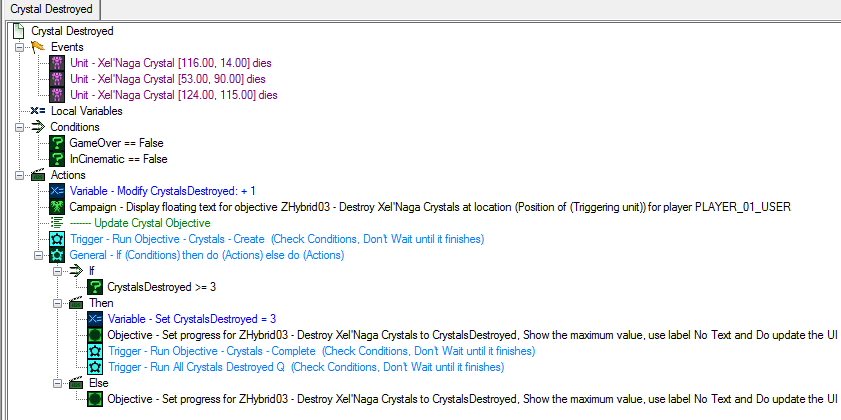
This is an example of a Trigger logic of a SC2 campaign map:
Events
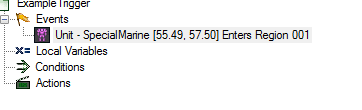
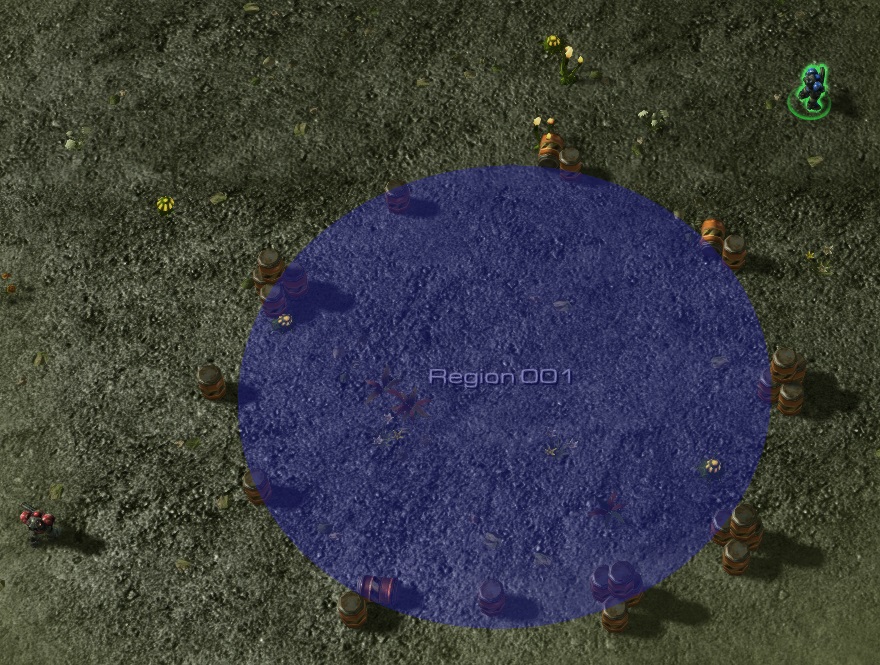
Events are a way to Trigger the Trigger logic, in other words, when an event happens the logic is executed. Here is an example of an event triggered when the unit “SpecialMarine” enters the region “Region 001”:
Conditions
Conditions are evaluated in order to execute the actions or not. Here is an example of a condition checking if unit “BadGuy” is alive or not:

Actions
Actions are executed when the event happened and the conditions are met. They could be anything supported by the editor, from ordering a structure to build a unit to showing a mission objective update on screen, among other things.
This example shows an action that enqueues to unit “BadGuy” an attack order with unit “SpecialMarine” as target, replacing existing enqueued orders in that unit. There is another action after that which turns off the Trigger in order to avoid processing its logic again.

The idea with this approach is to build the logic in a descriptive way, the Game Designer has tools to fulfill what he needs in terms of game experience. For example, he needs to make it hard to save a special unit when you reach its location, then he sends a wave of enemies to that point.
I said before that the editor generates C/C++ code behind the scenes, so, for my example:

The code generated behind the scenes is this one:
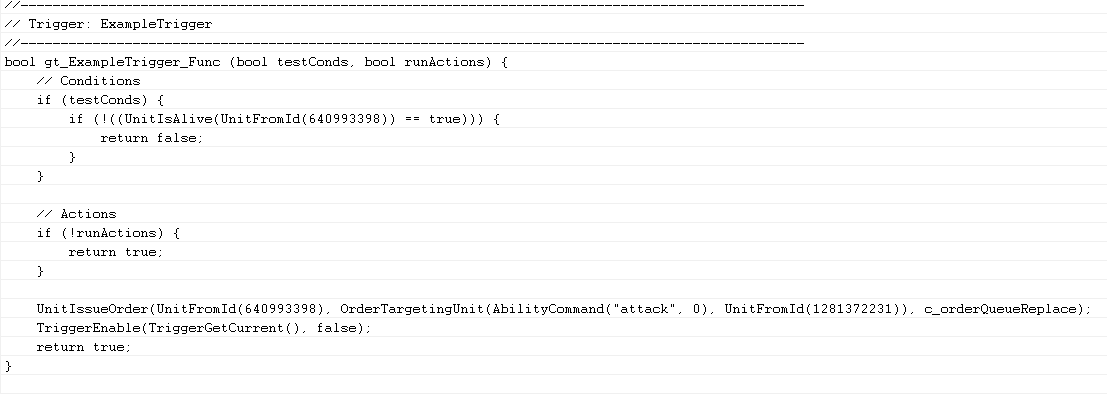
Here is a screenshot of the example I did, the red guy is the SpecialMarine (controlled by the player) and the blue one is the BadGuy (controlled by the map logic), if you move your unit inside the blue region, BadGuy comes in and attack SpecialMarine:
Even though it is really basic, download my example if you want to test it 😛 .
Parameters
In order to make the Triggers work, they need some values to check against, for example, Region1, is a region previously defined, or “Any Unit of Player1”. Most of the functions for Events, Conditions and Actions have parameters of a given Type, and the Editor allow the user to pick an object of that Type from different sources: a function, a preset, a variable, a value or even custom code:
 It shows picking a Unit from units in the map (created instances).
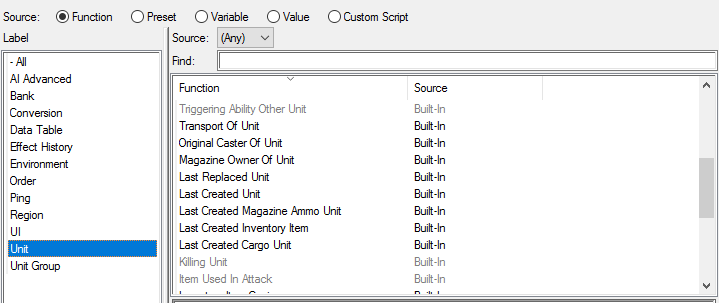 It shows Unit picking from different functions that return a Unit.
This allows the Game Designer to adapt, in part, the logic to what is happening in the game while keeping the main structure of the logic. For example, I need to make the structures of Player2 explode when any Unit of Player1 is in Region1, I don’t care which unit I only care it is from Player1.
Game design helper elements
There are different elements that help the Game Designer when creating the map: Regions, Points, Paths and Unit Groups, among others. These elements are normally not visible by the Player but are really useful to the Game Designer to have more control over the logic.
As said before, the SC2 Editor is pretty complete, it allows you to do a lot of stuff, from creating custom cutscenes to override game data to create new units, abilities, and more but that’s food for another post.
Our Editor v0.1
The first try of creating some kind of editor for our game wasn’t so successful. Without the core of the game clearly defined we tried to create an editor with a lot of the SC2 Editor features. We spent some days defining a lot of stuff in abstract but in the end we aimed too far for a first iteration.
So, after that, we decided to start small. We starting by making a way to detect events over the “being defined core” at that point. An event could be for example: “when units enter an area” or “when a resource spot was captured by a player”.
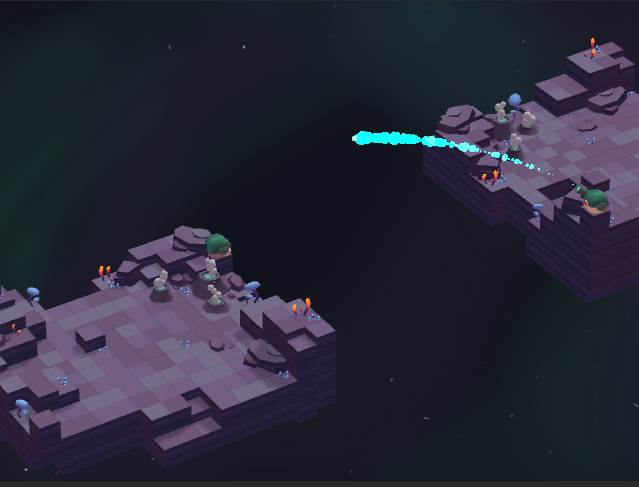
Here are some of the events of one of our maps:
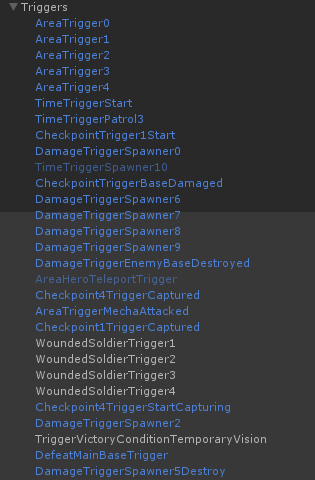
Note: Even though they are Events we named them Triggers (dunno why), so AreaTrigger is an empty Trigger in terms of SC2 Editor with just an Event.
Events were the only thing in the editor, all the corresponding logic was done in code in one class, corresponding to that map, which captures all events and checks conditions for taking some actions, normally, sending enemies to attack some area.
Here is an example code for some of the previous defined events:

It wasn’t a bad solution but had some problems:
- The actions were separated from the level design which played against the iteration cycle (at some point our project needed between 10 and 15 seconds to compile in the Unity Editor).
- Since it needs code to work, it requires programming knowledge and our team Game Designers aren’t so good with code.
Our Editor v0.2
The second (and current) version is more Game Designer friendly, and tends to be more similar to SC2 Editor. Most of the logic is defined in the editor within multiple triggers. Each Trigger is defined as a hierarchy of GameObjects with specific components to define the Events, Conditions and Actions.
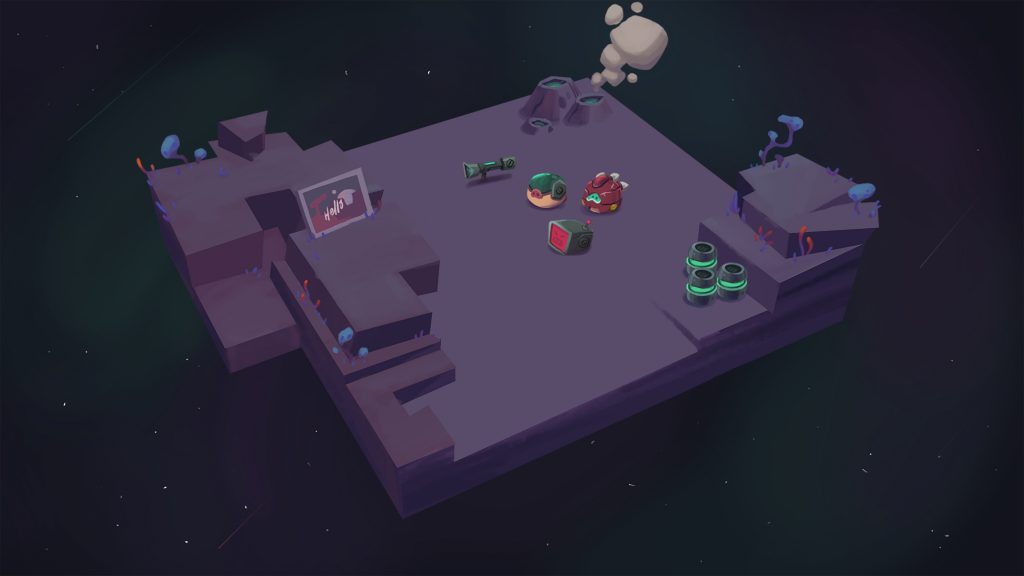
Here is an example of a map using the new system:
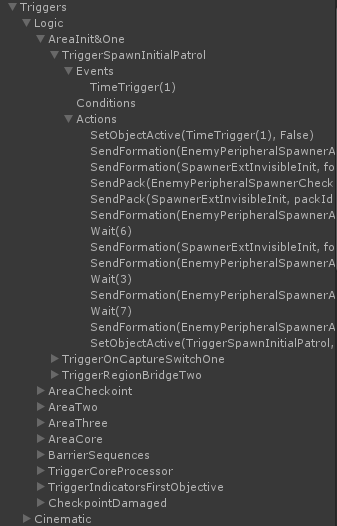
This declares for example a trigger logic that is activated by time, it has no conditions (so it executes always given the event) and it sends some enemies in sequence and deactivates itself at the end.
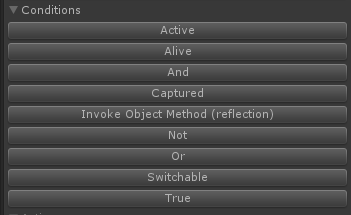
We also created a custom Editor window in order to help creating the trigger hierarchy and to simplify looking for the engine Events, Conditions and Actions. Here is part of the editor showing some of the elements we have:
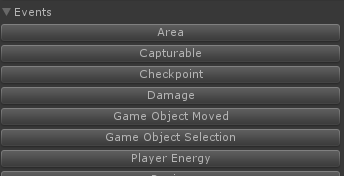
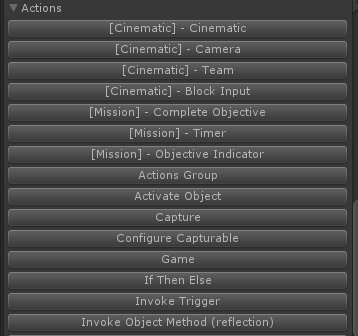
All those buttons automatically create the corresponding GameObject hierarchy with the proper Components in order to make everything work according to plan. Since most of them need parameters, we are using the Unity built-in feature of linking elements given a type (a Component), so for example, for the action of forcing capture a Capturable element by team Soldiers, we have:
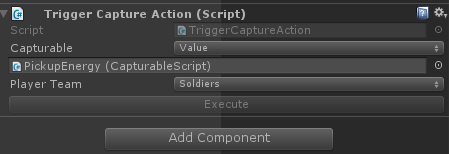
Unity allow us to pick a Capturable element (CapturableScript in this case) from the scene. This simplifies a lot the job of configuring the map logic.
Some common conditions could be to check if a resource spot is controlled by a given player or if a structure is alive. Common actions could be, send a wave of enemy units to a given area or deactivate a trigger.
The base code is pretty simple, it mainly defines the API while the real value of this solution is in the custom Events, Conditions and Actions.
Pros
- Visual, and more Game Designer friendly (it is easier for Programmers too).
- Faster iteration speed, now we can change things in Editor directly, even in runtime!
- Easily extensible by adding more Events, Conditions and Actions, and transparent to the Game Designers since they are automatically shown in our Custom Editor.
- Take advantage of Unity Editor for configuring stuff.
- Easy to disable/enable some logic by turning on/off the corresponding GameObject, which is good for testing something or disable one logic for a while (for example, during ingame cinematics).
- More control to the Game Designer, they can test and prototype stuff without asking programming team.
- Simplified workflow for our ingame cinematics.
- Compatible with our first version, both can run at the same time.
Cons
- Merge the stage is harder now that it is serialized with the Unity scene, with code we didn’t have merge problems or at least it was easier to fix. One of the ideas to simplify this is to break the logic in parts and use prefabs for those parts, but it breaks when having links with scene instances (which is a common case).
- A lot of programming responsibility is transferred to the scripting team which in this case is the Game Design team, that means possibly bad code (for example, duplicated logic), bugs (forget to turn off a trigger after processing the actions) and even performance.
Conclusion
When designing (and coding) a game, it is really important to have a good iteration cycle in each aspect of the game. Having switched to a more visual solution with all the elements at hand and avoiding code as much as we could, helped a lot with that goal.
Since what we end up doing looks similar to a scripting engine, why didn’t we go with a solution like uScript or similar in the first place? the real answer is I didn’t try in depth other Unity scripting solutions out there (not so happy with that), each time I tried them a bit they gave me the feeling it was too much for what we needed and I was unsure how they perform on mobile devices (never tested that). Also, I wasn’t aware we would end up need a scripting layer, so I prefered to evolve over our needs, from small to big.
Taking some time to research other games and play with the SC2 Editor helped me a lot when defining how our engine should work and/or why we should go in some direction. There are more aspects of our game that were influenced in some way by how other RTS games do it, which I may share or not in the future, who knows.
I love RTS games, did I mention that before?