Modifying textures using libGDX Pixmap in runtime - Explained
We have previously shown a bit how we were using LibGDX Pixmap to modify textures in runtime here and here for a game prototype we were doing. In this post I want to share more detail of how we do that. The objective was to make destructible terrain like in Worms 2.
Introduction
When you work with OpenGL textures, you can’t directly modify their pixels whenever you want since they are on OpenGL context. To modify them you have to upload an array of bytes using glTexImage2D or glTexSubImage2D. The problem is you have to maintain on the application side an array of bytes representing the modifications you want to do.
To simplify working with byte arrays representing images, LibGDX provides a useful class named Pixmap which is a map of pixels kept in local memory with some methods to interact with a native library to perform all modifications with better performance.
Moving data from Pixmap to OpenGL Texture
In our prototypes, we wanted to remove part of the terrain whenever a missile touches it, like a Worms 2 explosion. That means we need some way to detect the collisions between the missile and the terrain and then a way to remove pixels from a texture.
We simplified the first problem by getting the color of the pixel only for the missile’s position and checking if it was transparent or not. A more correct solution could be using a bitmap mask to check collisions between pixels but we wanted to simplify the work for now.
For the second problem, given a radius of explosion of the missile, we used the pixmap fillCircle method by previously setting the color to (0,0,0,0) (fully transparent) and disabled Pixmap blending to override those pixels.
But that only modified the pixmap data, now we needed to modify the OpenGL texture. To do that, we called OpenGL glTexImage2D using the bytes of the pixmap as the new texture data and that worked correctly.
Transforming from world coordinates to Pixmap coordinates
One problem when working with pixmaps is we have to map world coordinates (the position of the missile for example) to coordinates inside the Pixmap.
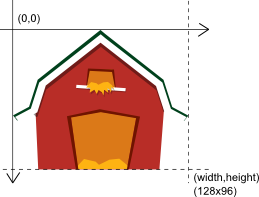
This image shows the coordinate system of the Pixmap, it goes from 0 to width in x and 0 to height in y.
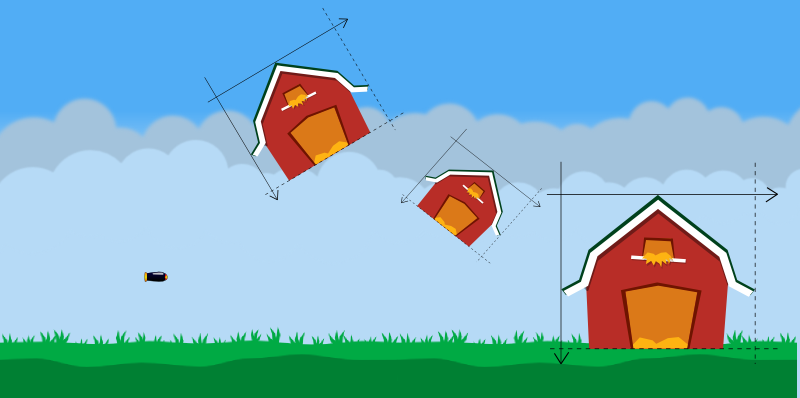
This image shows how we normally need to move, rotate and resize the Pixmap in a game.
To solve this, we are using a LibGDX Sprite to maintain the Pixmap transformation, so we can easily move, rotate and scale it. Then, we can use that information to project a world coordinate to Pixmap coordinate by applying the inverse transform, here is the code:
public void project(Vector2 position, float x, float y)
{
	position.set(x, y);

	float centerX = sprite.getX() + sprite.getOriginX();
	float centerY = sprite.getY() + sprite.getOriginY();

	position.add(-centerX, -centerY);

	position.rotate(-sprite.getRotation());

	float scaleX = pixmap.getWidth() / sprite.getWidth();
	float scaleY = pixmap.getHeight() / sprite.getHeight();

	position.x *= scaleX;
	position.y *= scaleY;

	position.add( //
			pixmap.getWidth() * 0.5f, //
			-pixmap.getHeight() * 0.5f //
	);

	position.y *= -1f;
}
(note: it is the first version at least, it could have bugs and could be improved also)
To simplify our work with all this stuff, we created a class named PixmapHelper which manage a Pixmap, a Texture and a Sprite, so we could move the Sprite wherever we wanted to and if we modify the pixmap through the PixmapHelper then the Texture was automatically updated and hence the Sprite (since it uses internally the Texture).
The next video shows how we tested the previous work in a prototype were we simulated cluster bombs (similar to Worms 2):
Some adjustments to improve performance
Instead of always working with a full size Pixmap by modifying it and then moved to the OpenGL texture, we created smaller Pixmaps of fixed sizes: 32x32, 64x64, etc. Then, each time we needed to make an explosion, we used the best Pixmap for that explosion and then we called glTexSubImage2D instead glTexImage2D to avoid updating untouched pixels. One limitation of this modification is we have to create and maintain several fixed size pixmaps depending on the modification size. Our current greater quad is 256x256 (almost never used).
Then, we changed to store each modification instead performing them in the moment the PixmapHelper erase method was called, and we added an update method which performs all modifications together. This improvement allow us to call Pixmap update method when we wanted, maybe one in three game updates or things like that.
Conclusion
Despite using LibGDX Pixmap for better performance, moving data to and from OpenGL context is not a cheap operation, on Android devices this could means some pauses when refreshing the modified textures with the new data. However, there is a lot of space for performance improvement, some ideas are to work only with pixmap of less bits instead RGBA8888 and use that one as the collisions context and as the mask of the real image (even using shaders), between other ideas.
Finally, the technique looks really nice and we believe that it could be used without problems for a simple game but it is not ready yet to manage a greater game like Worms 2.
Hope you like the technique and if you use it, maybe even also share your findings.
P.S.: In case you were wondering: yes, I love Worms 2.
Reusing Artemis entities by enabling, disabling and storing them
As we mentioned on a previous post, we were having some performance issues in Vampire Runner and we were trying different approaches to improve its performance.
Introduction
One limitation of Android when making games is you have to avoid generating garbage whenever you can since the garbage collection would generate pauses on your games and that leads to a bad user experience. Then, we should try to reuse already created object instead of creating new ones.
In Vampire Runner, one problem we were having was that we were creating a lot of entities at a specific moment of the game, when we detected a new obstacle should be created, and that was making some pauses on the Android version.
As we use Artemis, we should try to reuse some entities when we can. For example, if we make a shooting game (like the Jetpac prototype I made) it seems a good idea to reuse bullets since their life cycle is really short. Ziggy made two blog posts about this topic some weeks ago here and here, however we followed a slightly different approach and we will explain it in this post.
Storing entities to reuse them
We created a concept named Store (similar to LibGDX Pool
free(T t) // returns an entity to the Store to be reused later

get() : t // returns an entity from the Store, it reuses an object from the free
      collection if there is one or creates a new object otherwise.
The idea is to, for example, instead of creating a new bullet when a weapon is fired, calling store.get() and set the component values as they should be, and when the bullet collides with something call the store.free(e) instead of deleting the entity, so we can reuse it later.
This is a generic approach and we can use different stores to reuse different kind of entities but it has a big problem, those entities keep being in Artemis world, that means they keep being processed (collisions, render, etc). A basic solution to this problem was adding a new state to the entity, and we explain that in the following section.
Enabling and disabling Artemis entities
Artemis supports reuse of entities by internally caching created entities inside the World class, however their state (which components their have) is not easily reused, and that was one of the big problems when creating a new entity, we wanted to reuse their state.
Our current solution to the problem was adding a new state to the entities, if they are enabled or not. Being enabled means the entity is processed by all interested EntitySystems, being disabled means the entity is still in the Artemis world but it is not processed by any system.
So, in our customization of Artemis we added three new methods to Entity to be called whenever you want to enable or disable an entity:
disable() : disables an entity to avoid it to be processed on EntitySystems

enable() : enables again an entity to let it be processed on EntitySystems

isEnabled() :  returns true if the entity is enabled, false otherwise.
Then, we added new methods to EntitySystem API to let each EntitySystem to be aware an entity of interest was enabled or disabled:
disabled(Entity e) : called whenever an entity of this EntitySystem was disabled

enabled(Entity e) : called whenever an entity of this EntitySystem was disabled
In our case, we are using them to enable and disable Box2D bodies in our PhysicsSystem, and also to remove them from our render layers in our RenderSystem.
As an example, we have a nice video of Vampire Runner we made by changing the zoom of the camera to see the behind the scenes:
As you can see, when entities like wall, fire and Christmas stuff are behind the main character, they disappear. That is because they are disabled and moved again to their stores so they stop being processed by Artemis, in particular, stop being rendered.
Conclusion
By combining both solutions, we have an easy way to reuse created entities of one kind, like our obstacles tiles in Vampire Runner, while at the same time we can disable them when they are on a store to avoid them being processed.
In case of Vampire Runner, this solution improved Vampire Runner performance since we now pre create a lot of entities we need during the game and then disable them and enable them only when needed, in this way, we could avoid creating a lot of entities in one update after the game was started.
This is a first approach solution to the problem and seems good for our current games but it may not fit other type of games or bigger games, we don’t know that yet.
If you use Artemis and you had this problem too, hope this blog post is helpful to you.
Basic frustum culling to avoid rendering entities outside screen
As we were having some performance issues with Vampire Runner and we didn’t have a clear idea of what was happening, we started trying some improvement techniques. The first one we implemented was a basic frustum culling technique to avoid trying to render objects outside of the screen.
Basic implementation
First, we created an Artemis component named FrustumCullingComponent with a Rectangle representing the bounds of that entity to easily detect if the entity is inside the screen or not. For now, as it is a basic implementation, the rectangle was only modified when the entity was created. So, for example, if we know an entity was able to rotate during the game, then we create a bigger bounding box using box diagonal.
Then, we added a method to our custom 2d Camera implementation to get the camera frustum (by making the corresponding transformations).
Finally, we modified our Artemis render system to check before rendering if an entity has or not a FrustumCullingComponent, if it hasn’t one, then we perform the render logic as we always did. If it has one, then we check if the bounds of that entity overlaps with the camera frustum, if it does, then we render as we always did, if it doesn’t, then we avoid rendering that entity.
Here is an example of the bounds and the frustum of the camera:
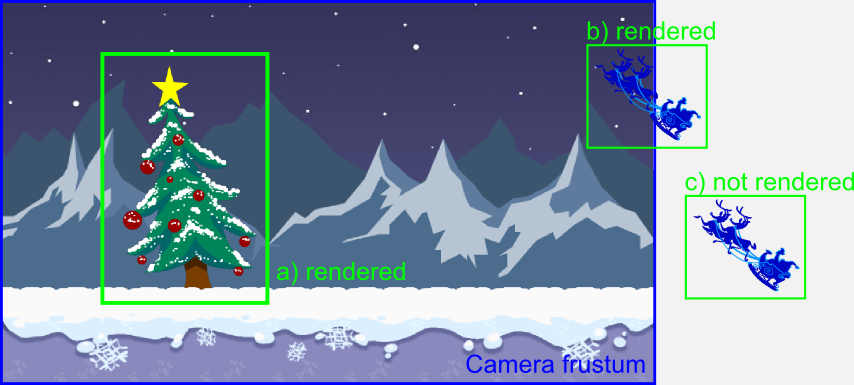
In the image, the element (a) and (b) are rendered because their bounds overlaps with the camera frustum. The element (c) is not rendered because its bounds are totally outside the camera frustum.
Conclusion
For Vampire Runner, we didn’t notice the difference of having this technique enabled or not since the game always render fast (on our devices) and we had no metrics of the render process time. However, as it was really easy to implement this basic version of the technique, we believe it should help to maintain render performance, and we can reuse the logic for all of our games.
As always, hope you like it.
Simulating parallax scrolling for 2d game
In this post we want to share how we simulated parallax scrolling in Vampire Runner, a simple technique that could be used in any 2d game.
Introduction
The basic idea to simulate parallax is to work with different render layers and to move them at different speeds.
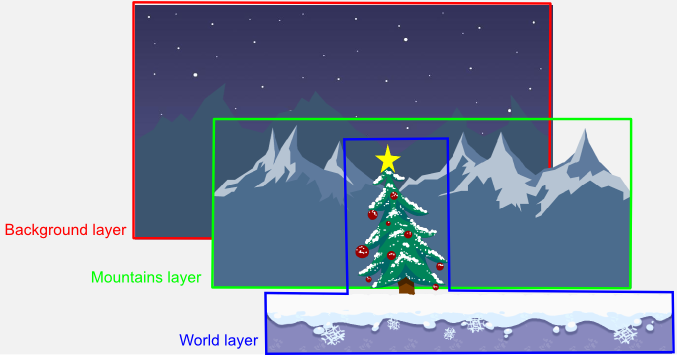
To easily understand the post, we will work with a basic example based on Vampire Runner graphics where we have three layers, the first layer is the background which is static, the second layer are the mountains and the third layer is the world layer where the main character runs.
In Vampire Runner, the main character is the center of the world, despite being running, he is in a fixed position on the screen while all the other objects move accordingly to give the correct idea.
To simulate the parallax, each layer of objects moves at different speeds to give the correct idea of depth. In case of Vampire Runner, the background layer is static, the mountains layer moves at 1/12 the speed of the main character and the world layer moves at the speed of the main character.
Simulating movement with cameras
We said before that the character is in a fixed position on the screen, however the real entity of the character is moving around the world, even more, he is running!.
To simulate him being in a fixed position, we have a camera following the character, so the player always see the character in the same position.
However, as all the other objects (obstacles, trees, etc) have a fixed position in the world when the camera follows the main character they move in the opposite direction. That is how we move the world layer and the mountains layer. The only difference is we move the mountains layer camera slower.
In conclusion, we have one camera for each layer and two of them move following the main character.
Using OpenGL model view matrices to configure the cameras
As we are using OpenGL through LibGDX (and LWJGL on desktop), we need to translate all the previous camera behavior to OpenGL.
In OpenGL, to simulate a world camera what you typically modify the model view matrix and then render the objects.
So, for Vampire Runner, we had three different matrices to render each layer, and the render method was something like this:
  1.1 configure background layer camera
  1.2 render background layer

  2.1 configure mountains layer camera
  2.2 render mountains layer

  3.1 configure world layer camera
  3.2 render world layer
In the update method we only had to update the cameras depending on the character position.
To simplify the work, if you are using LibGDX, you can use the Camera class which comes with a proper class for 2d games named OrthographicCamera. In our case we used a custom implementation which provided a nicer API to work with.
Conclusion
Working with different cameras with OpenGL is not so hard and it let you achieve a correct feeling when moving across the world.
As always, hope you like the post.
Leave me Alone!!, my game for Ludum Dare 22
To continue with tradition, I made a game for Ludum Dare 22. In this case, the theme was “alone”, and I made a game named Leave me alone!! (sadly, it seems like there are 3 or more games named that way).
I had little time to spend making the game so I targeted a simple game with almost no graphics nor sounds but fun.
The story behind the game is, you have to isolate a particle from other particles to keep the world safe, if they make contact then the world explodes in a mega hyper super duper explosion (use your imagination).
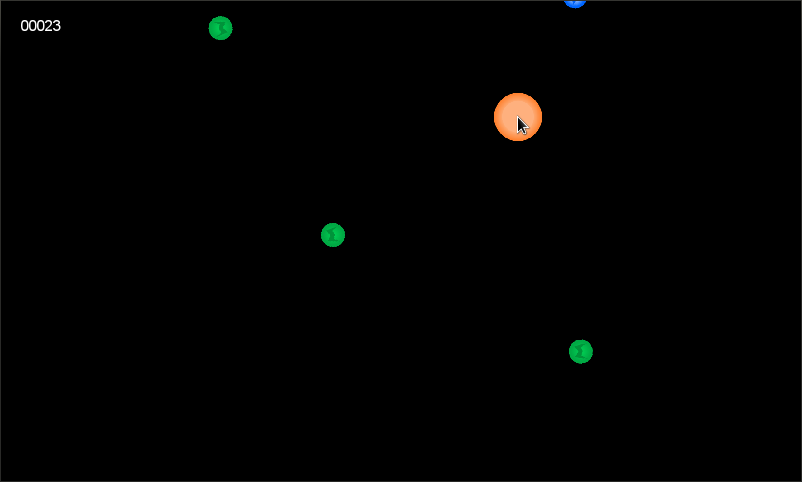
Here is a screenshot:
I recorded the timelapse but it was really boring so this time I will not upload it, however, I made a gameplay video:
I will be happy if you can play it, and rate it (if you participated ludum dare), and love it 😉
Enjoy it.