Android and Desktop games internationalization using Java and LibGDX
Recently, we had to add multiple language support for a game we are developing. As you may know, Java provides classes to simplify the task of making your application available in multiple languages. In this post we want to share a bit our experience when using Java localization classes in a LibGDX application to provide multiple language support for both Android and desktop platforms.
Quick introduction
Java provides a class named ResourceBundle which provides a way to store resources (mainly strings) for a given locale, so you can ask for a string identified by a key and it will return the text depending the current locale. You can read the article Java Internationalization: Localization with ResourceBundles if you want to know more about how to use Java classes for internationalization. The rest of the post assumes you know something about Locale and ResourceBundle classes.
Why we don’t use Android resources
Android provides also a way to support multiple locale resources but it depends on Android API, so we prefer to use the Java API instead which should work on all platforms.
Our experience when using Java internationalization on Android
When letting ResourceBundle to automatically load resources bundles from properties files, Java expects them to be in ISO-8859-1 encoding. However, it seems Android behaves in a different way and expects another encoding by default. So, when resource bundles are automatically loaded in Android from an ISO-8859-1 properties file with special characters, it loads them wrong.
The first try
The first solution we tried to fix this was to call ResourceBundle.getBundle() method using a custom Control implementation which creates PropertyResourceBundles using an InputReader with the correct encoding. Here is a code example to achieve that:
public class EncodingControl extends Control {

	String encoding;

	public EncodingControl(String encoding) {
		this.encoding = encoding;
	}

	@Override
	public ResourceBundle newBundle(String baseName, Locale locale, String format, ClassLoader loader, boolean reload)
			throws IllegalAccessException, InstantiationException, IOException {
		String bundleName = toBundleName(baseName, locale);
		String resourceName = toResourceName(bundleName, "properties");
		ResourceBundle bundle = null;
		InputStream inputStream = null;
		try {
			inputStream = loader.getResourceAsStream(resourceName);
			bundle = new PropertyResourceBundle(new InputStreamReader(inputStream, encoding));
		} finally {
			if (inputStream != null)
				inputStream.close();
		}
		return bundle;
	}
}
After that, we customized the Control class to work with LibGDX FileHandle in order to place the properties files in the assets folder. Here is the final code for our Control implementation:
public class GdxFileControl extends Control {

	private String encoding;
	private FileType fileType;

	public GdxFileControl(String encoding, FileType fileType) {
		this.encoding = encoding;
		this.fileType = fileType;
	}

	public ResourceBundle newBundle(String baseName, Locale locale, String format, ClassLoader loader, boolean reload)
			throws IllegalAccessException, InstantiationException, IOException {
		// The below is a copy of the default implementation.
		String bundleName = toBundleName(baseName, locale);
		String resourceName = toResourceName(bundleName, "properties");
		ResourceBundle bundle = null;
		FileHandle fileHandle = Gdx.files.getFileHandle(resourceName, fileType);
		if (fileHandle.exists()) {
			InputStream stream = null;
			try {
				stream = fileHandle.read();
				// Only this line is changed to make it to read properties files as UTF-8.
				bundle = new PropertyResourceBundle(new InputStreamReader(stream, encoding));
			} finally {
				if (stream != null)
					stream.close();
			}
		}
		return bundle;
	}
}
And that can be called in this way:
ResourceBundle.getBundle("messages", new GdxFileControl("ISO-8859-1", FileType.Internal))
That worked really well until we discovered that Android API sucks and doesn’t support ResourceBundle.Control before API level 9, that means our solution works only for users with Android 2.3+. That’s a problem since we want to support 2.0+, so we had to think another way to solve this.
The second try
After some tests, we discovered that if we construct a PropertyResourceBundle using an InputStream, the expected encoding is ISO-8859-1 for both desktop and Android. That means that, if we use that specific PropertyResourceBundle constructor, we don’t have to force the encoding. So, the new solution consists in building a PropertyResourceBundle for each locale and configuring the hierarchy ourselves by setting their parent ResourceBundle. Here is an example of what we do now:
FileHandle rootFileHandle = Gdx.files.internal("data/messages.properties");
FileHandle spanishFileHandle = Gdx.files.internal("data/messages_es.properties");
ResourceBundle rootResourceBundle = new PropertyResourceBundle(rootFileHandle.read());
ResourceBundle spanishResourceBundle = new PropertyResourceBundle(spanishFileHandle.read()) {
	{
		setParent(rootResourcebundle);
	}
};
After that we created a map of ResourceBundles for each Locale we support, so we can call something like:
ResourceBundle resourceBundle = getResourceBundle(new Locale("es"));
The good part is this solution works well for both Android and desktop despite the Android API level (PropertyResourceBudndle seems to be supported from API Level 1). The bad part is that we lost the ResourceBundle logic to automatically build the hierarchy of resources and we had to do that manually now.
UPDATE: The class we use for this stuff is available in our commons-gdx project, resources module with the name of ResourceBundleResourceBuilder.
Conclusion
Supporting multiple languages in an application is a way to say users of all around the world you care about them but translating text to several languages is not cheap at all, however, Java provides a good framework to simplify the job if you decide to support internationalization.
And as a side conclusion: never assume all the Java classes you are using are implemented for the minimum Android API you are targeting.
References
- Java Internationalization: Localization with ResourceBundles - http://java.sun.com/developer/technicalArticles/Intl/ResourceBundles/
- How to use UTF-8 in resource properties with ResourceBundle - http://stackoverflow.com/questions/4659929/how-to-use-utf-8-in-resource-properties-with-resourcebundle
Area triggers using Box2D, Artemis and SVG paths
As we explained in previous posts, we are using Inkscape to design the levels of some of our games, in particular, our current project. In this post we want to share how we are making area triggers using Box2D sensor bodies, Artemis and SVG paths.
What is an area trigger
When we say area trigger we mean something that should be triggered, an event for example, when an entity/game object enters the area, to perform custom logic, for example, ending the game or showing a message. Some game engines provides this kind of stuff, for example Unity3d with its Collider class and different events like OnTriggerEnter.
Building an area trigger in Inkscape
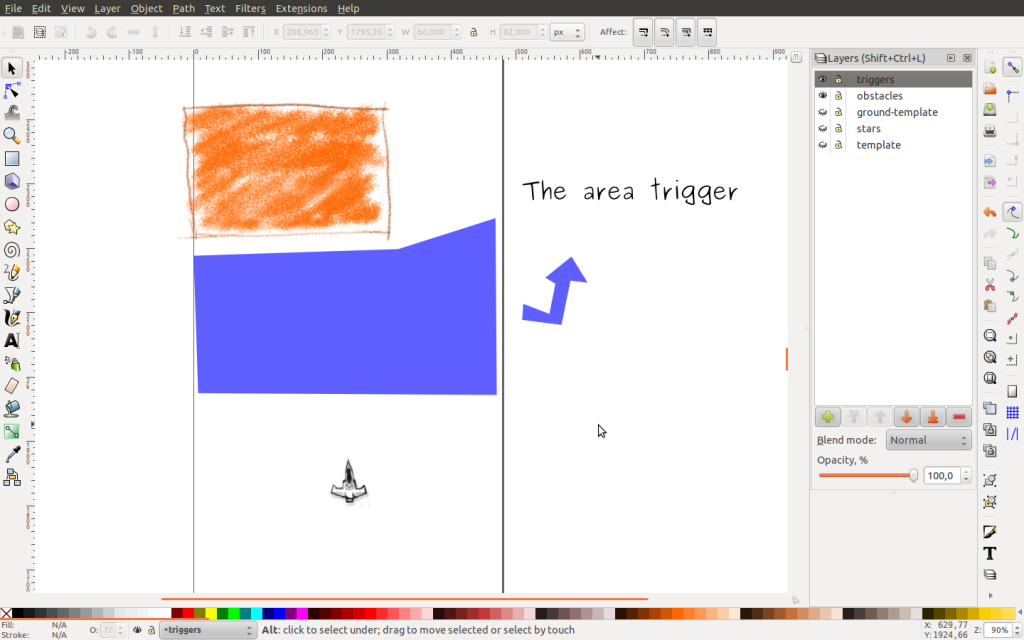
Basically, we use SVG paths with custom XML data to define the area trigger to later parse it by the game level loader to create the corresponding game entities. The following screen shot shows an example of an area defined using Inkscape:
Right now, we are exporting two values with the SVG path, the event we want to fire identified by the XML attribute named eventId, and extra data for that event identified by the XML attribute eventData. For example, for our current game we use the eventId showTutorial with a text we want to share with the player on eventData attribute like "Welcome to the training grounds". The following example shows the XML data added to the SVG path:
<path
	id="path4187"
	eventId="showTutorial"
	eventData="We will start by learning how the ship moves..."
	d="m 4.242641,5927.8761 482.246829,0 0,-205.0609 -489.3178971,-8.4853 z"
/>
The exported data may depend on your framework or game, so you should export whatever data you need instead.
Defining the area trigger inside the game
Inside the game, we have to define a entity/game object for the area trigger. In the case of our current game, that entity is composed by a Box2D sensor body with a shape built using the SVG path and a Script with logic to perform when the main character collides it.
We use sensor bodies because they are mainly used to detect collisions but not to react to them by changing their angular and linear velocities. As we explained in a previous post, we are using our custom builders to help when building Box2D bodies and fixtures. Our current body declaration looks like this:
Body body = bodyBuilder //
	.fixture(bodyBuilder.fixtureDefBuilder() //
		.polygonShape(vertices) // the vertices from the SVG path
		.categoryBits(Collisions.Triggers) // the collision category of this body
		.maskBits(Collisions.MainCharacter) // the collision mask
		.sensor() //
	) //
	.position(0f, 0f) //
	.type(BodyType.StaticBody) //
	.angle(0f) //
	.userData(entity) //
	.build();
The previous code depends on specific stuff of the current game but it could be modified to be reused in other projects.
As we explained in another previous post, we are using a basic scripting framework over Artemis. Our current script to detect the collision looks like this:
public static class TriggerWhenShipOverScript extends ScriptJavaImpl {

	private final String eventId;
	private final String eventData;

	EventManager eventManager;

	public TriggerWhenShipOverScript(String eventId, String eventData) {
		this.eventId = eventId;
		this.eventData = eventData;
	}

	@Override
	public void update(World world, Entity e) {
		PhysicsComponent physicsComponent = Components.getPhysicsComponent(e);
		Contacts contacts = physicsComponent.getContact();

		if (contacts.isInContact()) {
			eventManager.submit(eventId, eventData);
			e.delete();
		}
	}
}
For the current game, we are testing this stuff for a way to communicate with the player by showing messages from time to time, for example, in a basic tutorial implementation. The next video shows an example of that working inside the game:
Conclusion
The idea of the post is to share a common technique of triggering events when a game object enters an area, which is not framework dependent. So you could use the same technique using your own framework instead Box2D and Artemis, a custom level file format instead SVG and the editor of your choice instead Inkscape.
References
- Custom XML data - </2011/04/28/archers-vs-zombies-dev-log-03/>
- Scripting with Artemis - </2011/11/13/scripting-with-artemis/>
- Simplifying building Box2D bodies and joints - </2011/06/27/simplifying-building-bodies-and-joints-with-libgdx-box2d>
- Unity3d Collider - http://unity3d.com/support/documentation/ScriptReference/Collider.html
- Using Inkscape as Scene Editor - </2011/05/03/using-inkscape-as-scene-editor/>
Building 2d animations using Inkscape and Synfig
In this blog post we want to share a method to animate Inkscape SVG objects using Synfig Studio, trying to follow a similar approach to the Building 2d sprites from 3d models using Blender blog post.
A small introduction about Inkscape
Inkscape is one of the best open source, multi platform and free tools to work with vector graphics using the open standard SVG.
After some time using Inkscape, I have learned how to make a lot of things and feel great using it. However, it lacks of some features which would make it a great tool, for example, a way to animate objects by making interpolations of its different states defining key frames and using a time line, among others.
It has some ways to create interpolations of objects between two different states but it is unusable since it doesn’t work with groups, so if you have a complex object made of a group of several other objects, then you have to interpolate all of them. If you make some modification on of the key frames, then you have to interpolate everything again.
Synfig comes into action
Synfig Studio is a free and open-source 2D animation tool, it works with vector graphics as well. It lets you create nice animations using a time line and key frames and lets you easily export the animation. However, it uses its own format, so you can’t directly import an SVG. Luckily, the format is open and there are already some ways to transform from SVG to Synfig.
In particular I tried an Inkscape extension named svg2sif which lets you save files in Synfig format and seems to work fine (the page of the extension explains how to install it). I don’t know possible limitations of the svg2sif Inkscape extension, so use it with caution, don’t expect everything to work fine.
Now that we have the method defined, we will explain it by showing an example.
Creating an object in Inkscape
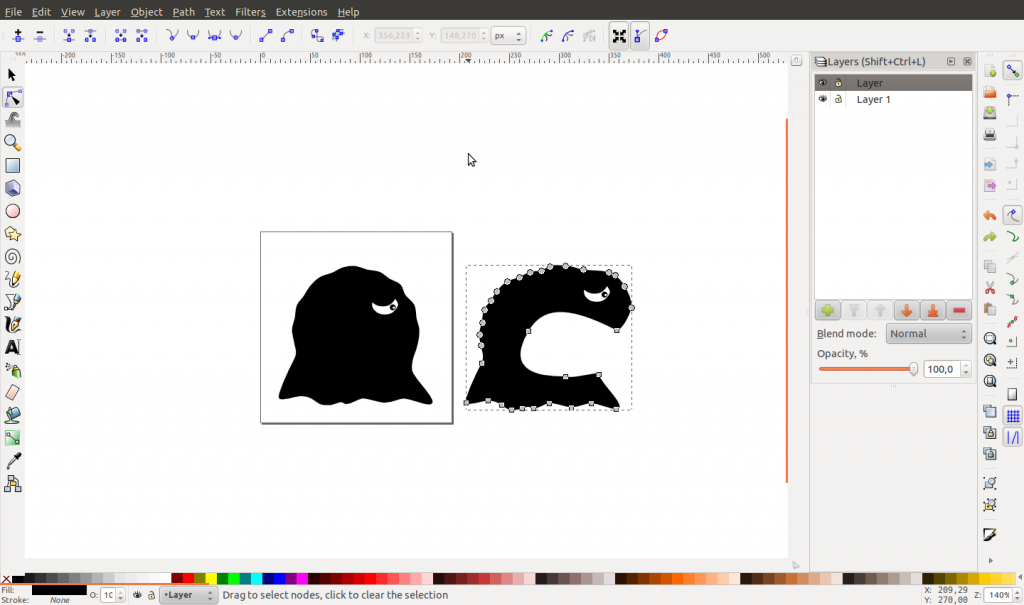
We start by creating an Inkscape object to be animated later. For this mini tutorial I created a black creature named Bor…ahem! Gishus Maximus:
Here is the SVG if you are interested on it, sadly WordPress doesn’t support SVG files as media files.
With the model defined, we have to save it as Synfig format using the extension, so go to “Save a Copy…” and select the .sif format (added by the svg2sif extension), and save it.
Animating the object in Synfig
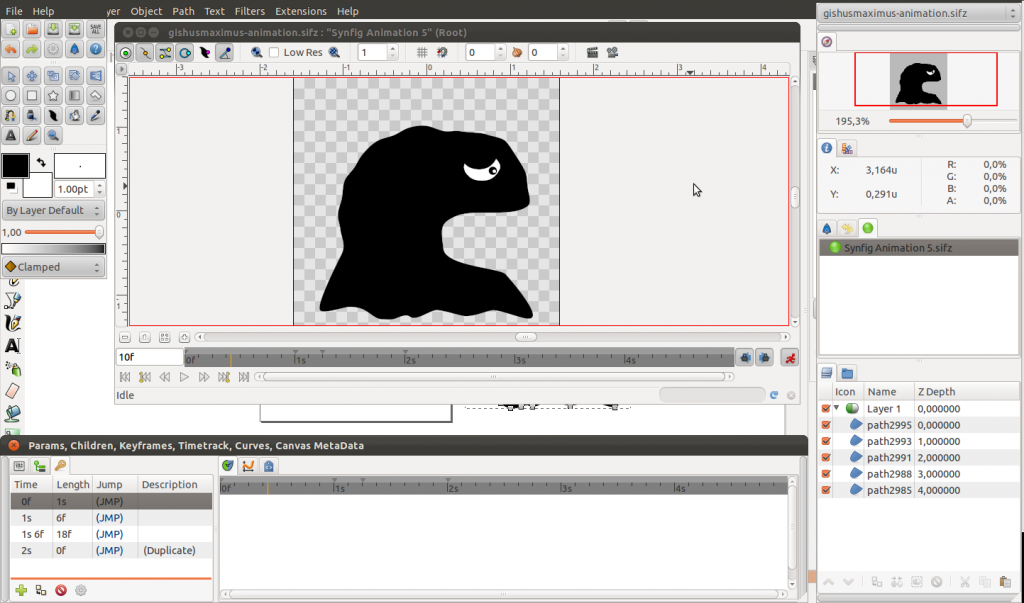
Now that we have the Synfig file we open it and voilà, we can animate it. However, there is a bug, probably with the svg2sif extension and the time line is missing. To fix it, we have to create a new document and copy the shape from the one exported by Inkscape to the new one.
The next step is to use your super animation skill and animate the object. In my case I created some kind of eating animation by making a mouth, opening it slow and then closing it fast:
Here is the Synfig file with the animation if you are interested on it.
To export it, use the “Show the Render Settings Dialog” button and configure how much frames per second you want, among other things, and then export it using the Render button. You can export it to different format, for example, a list of separated PNG files for each animation frame or an animated GIF. However, it you can’t configure some of the formats and the exported file is not what I wanted so I preferred to export to a list of PNG files and then use the convert tool to create the animated GIF:
Finally, I have a time lapse of how I applied the method if you want to watch it:
Extra section: Importing the animation in your game
After we have separated PNG files for the animation, we can create a sprite sheet or use another tools to create files to be easily imported by a game framework. For this example, I used a Gimp plug-in named Sprite Tape to import all the separated PNG files and create a sprite sheet:
If you are a LibGDX user and want to use the Texture Packer, you can create a folder and copy the PNG files changing their names to animationname_01, animationname_02, etc, and let Texture Packer to automatically import it.
Conclusions
One problem with this method is that you can’t easily modify your objects in Inkscape and then automatically import them in Synfig and update the current animation to work with it. So, once you moved to Synfig you have to keep there to avoid making a lot of duplicated work. This could be avoided if Inkscape provided a good animation extension.
Synfig Studio is a great tool but not the best of course, it is not intuitive (as Gimp, Blender and others) and it has some bugs that make it explode without reason. On the other hand, it is open source, free and multi platform and the best part is that it works well for what we need right now 😉
This method allow us to animate vector graphics which is great since it is a way for programmers like us to animate their programmer art 😀
Finally, I am not an animation expert at all, so this blog post could be based on some wrong assumptions. So, if you are one, feel free to correct me and share your opinions.
As always, hope you like the post.
Implementing transitions between screens
Using transitions between game screens is a great way to provide smoothness between screen changes, for example, fade out one screen and then fade in the next one. The next video shows an example of those effects our Vampire Runner game.
In this post, we will show a possible implementation of transitions between screens using LibGDX, however the code should be independent enough to be easily ported to other frameworks.
Although we implemented it using the our own concept of GameState, we will try to use LibGDX Screen concept in this post to simplify understandability.
Implementation
The implementation is based in the concept of TransitionEffect. A TransitionEffect holds the render logic of one of the effects of the transition being performed.
class TransitionEffect {

	// returns a value between 0 and 1 representing the level of completion of the transition.
	protected float getAlpha() { .. }

	void update(float delta) { .. }

	void render(Screen current, Screen next);

	boolean isFinished() { .. }

	TransitionEffect(float duration) { .. }
}
An implementation example of a TransitionEffect is a FadeOutTransitionEffect to perform a fade out effect:
class FadeOutTransitionEffect extends TransitionEffect {

	Color color = new Color();

	@Override
	public void render(Screen current, Screen next) {
		current.render();
		color.set(0f, 0f, 0f, getAlpha());
		// draw a quad over the screen using the color
	}

}
Then, in order to perform a transition between Screens, we need a custom Screen with the logic to apply render each transition effect and to set the next Screen when the transition is over. This is a possible implementation:
class TransitionScreen implements Screen {
	Game game;

	Screen current;
	Screen next;

	int currentTransitionEffect;
	ArrayList<TransitionEffect> transitionEffects;

	TransitionScreen(Game game, Screen current, Screen next, ArrayList<TransitionEffect> transitionEffects) {
		this.current = current;
		this.next = next;
		this.transitionEffects = transitionEffects;
		this.currentTransitionEffect = 0;
		this.game = game;
	}

	void render() {
		if (currentTransitionEffect >= transitionEffects.size()) {
			game.setScreen(next);
			return;
		}

		transitionEffects.get(currentTransitionEffect).update(getDelta());
		transitionEffects.get(currentTransitionEffect).render(current, next);

		if (transitionEffects.get(currentTransitionEffect).isFinished())
			currentTransitionEffect++;
	}
}
Finally, each time we want to perform a transition between two screens, we have to create a new TransitionScreen with the current and next Screens and a collection of effects we want. For example:
Screen current = game.getScreen();
	Screen next = new HighscoresScreen();

	ArrayList<TransitionEffect> effects = new ArrayList<TransitionEffect>();

	effects.add(new FadeOutTransitionEffect(1f));
	effects.add(new FadeInTransitionEffect(1f));

	Screen transitionScreen = new TransitionScreen(game, current, next, effects);

	game.setScreen(transitionScreen);
As we mention before, we use our own concepts in our implementation. If you want to see our code take a look at the classes ApplicationListenerGameStateBasedImpl, GameState and GameStateTransitionImpl (do not expect the best code in the world).
Conclusion
Adding transitions between the game screens gives users a feeling of smoothness, and we believe it worth the effort.
Also, we like the current design lets you implement different effects for the transitions, we only shown fade out and fade in as example because they are really simple to implement and we are using only those for our games.
As always, hope you like the post.
Toasting with LibGDX Scene2D and Animation4j
For our latest Vampire Runner update we changed to use LibGDX scene2d instead Android GUI. The main reason for the change is that we wanted to use a common GUI API for Android and PC, and sadly we can’t do that using Android API. With LibGDX scene2d we can code once and run in both platforms.
In particular, the toast feature of the Android API was really interesting to have and we want to share how we implemented it using LibGDX scene2d.
Toasting
A toast is defined as a scene2d Window that shows some text and disappear after a while, this is a pseudo code to give the idea of how to create that toast window:
Actor toast(String text, float time, Skin skin) {
	Window window = new Window(skin);
	window.add(new Label(text, skin));
	...
	window.action(new Action() {
		act(float delta) {
			// update the animation
			// if the animation is finished, we remove the window from the stage.
		}
	});
	...
	return window;
}
To animate the toast, we create a TimelineAnimation using animation4j defining that the window should move from outside the screen to inside the screen, wait some time and then go out of the screen again. The code looks like this:
TimelineAnimation toastAnimation = Builders.animation( //
	Builders.timeline() //
		.value(Builders.timelineValue(window, Scene2dConverters.actorPositionTypeConverter) //
			.keyFrame(0f, new float[] { window.x, outsideY }) //
			.keyFrame(1f, new float[] { window.x, insideY }) //
			.keyFrame(4f, new float[] { window.x, insideY }) //
			.keyFrame(5f, new float[] { window.x, outsideY }) //
		) //
	) //
	.started(true) //
	.delay(0f) //
	.speed(5f / time) //
	.build();
That code creates a new animation which modifies the position of the Window each time update() method is called.
Of course, you can animate the Window using LibGDX custom Actions or another animation framework like Universal Tween Engine, that is up to you.
If you want to see the code itself, you can see the Actor factory named Actors at our Github of commons-gdx.
In our subclass of Game, we added an empty Stage updated in each render() method, and a toast(string) method which creates a toast as explained before using default Skin and time.
MyGame extends Game {

	Stage stage;
	float defaultTime;
	Skin defaultSkin;

	render() {
		// all our game update and render logic
		...
		stage.act(delta);
		stage.draw();
	}

	toast(String text) {
		stage.add(Actors.toast(text, defaultTime, defaultSkin);
	}
}
So, if we want to toast about something, we only have to call game.toast(“something”) and voilá.
You can see a running example of this, you can run the Gui.Scene2dToastPrototype of our prototypes webstart (recommended), or watch the next video:
Conclusion
Despite being a bit incomplete and buggy yet, scene2d API is almost easy to use and it is great if you want to do simple stuff.
Using scene2d is great for our simple need of GUI interfaces because we can quickly test all the stuff in PC. In Vampire Runner we are using scene2d for the feedback dialog, the new version available dialog and for the change username screen.
An interesting thing to have in mind when using scene2d API is that you can make your own Skin to achieve a more integrated look and feel.
As always, hope you like the post and could be of help.


